Triumph Rat Motorcycle Forums banner

Tubeless Conversion Review

39K views 63 replies 35 participants last post by  Stanno  
#1 ·
Here's the follow up thread to one I posted a few months ago: "Anybody done a tubeless conversion with Seal All and Goop?"

This review is for anybody who's sick of running tubes and wants to try a DIY winter mod.

I'm going to be completely honest about what this entails, and I will also let you know if any failure emerges over time. And once Spring comes and I get rolling, I'll let you know whether I think there is an improvement that is worth the cost and hassle of this mod in how a Bonneville handles going from tubed Pirelli Sport Demon bias ply to tubeless Michelin PR4 radials.

It seems every year I take on a motorcycle related task that seems like a good idea but winds up taking WAYYY more time than I anticipate. This year was no different, but at least it gave me something to do over the Xmas break and provided me an excuse to be in the basement drinking beer, a safe distance from my in-laws.

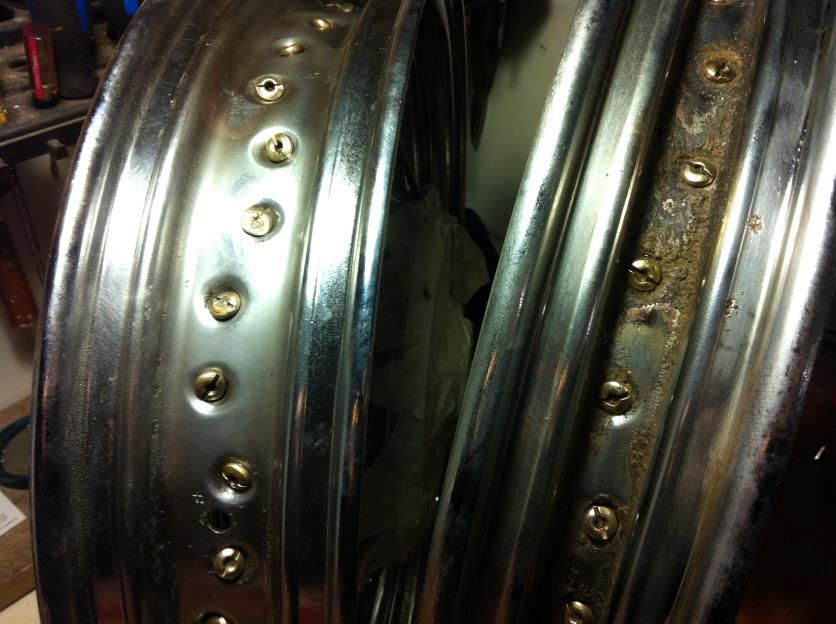
The first thing you should know with our stock wheels on these bikes is, if they are a few years old, and if you have ridden in rain or even used a hose when washing your bike, you will have rust on the inside of the rims. Maybe a LOT of rust. If you're accustomed to riding in to a shop and magically riding out with new tires, there's going to be a surprise for you. I was too depressed to take a photo when I first got the tires off and had a look, but here's a pic AFTER I'd done a fair amount of rust dissolving and scrubbing with steel wool.


Eventually I stopped screwing around and rented space at a do-it-yourself bead blasting shop and in 15 min for 25 bucks I took it down to bare metal the sensible way.

I should say now the method I decided on to seal the wheels was a combination of Seal All and Outex tape. The Outex kit is not cheap costing around $125.00 US but I just wasn't brave enough to cut corners on this job. It's quite likely that you needn't bother with Seal All with the Outex kit but I wanted a little extra security. No matter what, you MUST do a very thorough job of cleaning the inside of the rims right down to wiping them with alcohol for the final step. The cleaner the better.


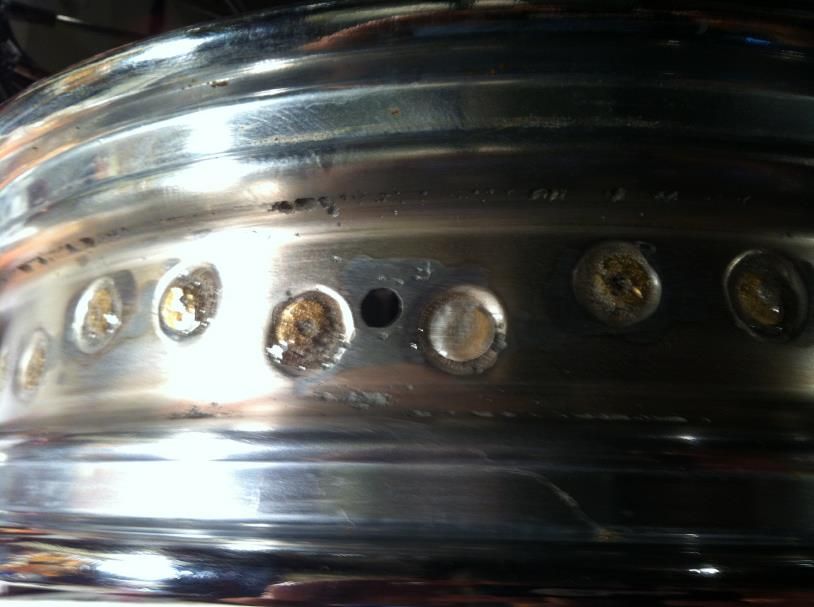
Getting the tape to adhere properly involves using a bench grinder to grind the heads of the spoke nipples so they are almost flush with the inside of the rim. Then I used a syringe to carefully drip Seal All into the nipple wells. I suspended the wheels with a wooden dowel between two sawhorses and did 4 nipples at a time so the Seal All sinks in and doesn't drip all over and make a mess. It's helpful to have a playoff game on TV to pause and go back and forth to while you're doing this (if you're obsessive enough to do this...) I did at least 3 applications to each nipple.

Here's what it looks like with the Seal All set. The one to the right of the valve hole has one of the caps that go on prior to applying the tape.


And here's with the Outex tape applied.


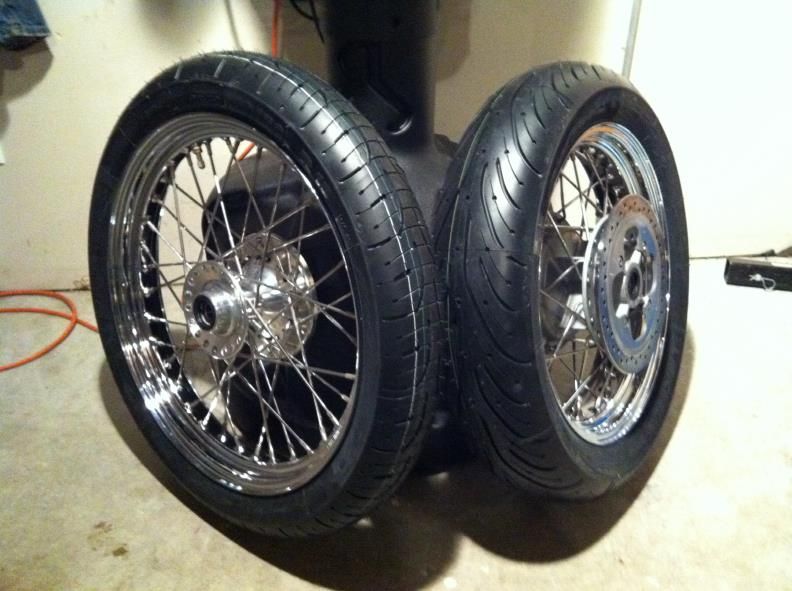
And finally, here's my decidedly "non-vintage looking" radial tires mounted on stock rims which I am delighted to report, hold air perfectly fine without tubes...so far. :smile2:

 
#3 ·
Outex kits come out of Japan and use a proprietary double sided pliable sticky tape with a protective strip and supposedly they've sold over ten thousand of them. There's a good 5 min video showing the application process if you google. Lots of Ducati Sport Classic owners have used this product. I'm surprised to be the only guy on this site talking about it.
 
#4 · (Edited)
I want to do this but probably won't. But it seems grinding the spoke nipples is a little risky. It looks like some of the nipples heads are rusted half away. You know the spokes that carry the weight of the bike are the ones at the top. The axle connected to the bikes weight is pulling down and using the top few spokes to hold the bike up. The spokes are under a stretching situation. The nipples are what take the abuse. The bottom spokes just go slack when you hit a pot hole. That is what would break your sealer loose. I think I'll just watch your progress.
I don't wash my bike with pressure water or a hose. Just hand wash it. Usually glass cleaner. The bike shop installing my tires have never mention any rust at 50,000 miles. The water comes in at the nipples. You have sealed that off. The tire shop didn't like the Slime I had in my tubes. Had to have new tubes which I had told them to do anyway. Good job. Keep us informed.


Sent from Motorcycle.com Free App
 
#5 · (Edited)
Water goes where it will

Yes, the YouTube video is pretty thorough. I hope your efforts pay off.

My question is whether water that surely will seep in past the spoke nipples will eventually work its way under the adhesive tape and cause a leak.

I assuming the tape itself it flexible enough to handle the very tiny bit of movement you might get on the nipples from road stresses. What about ever having to turn-up the spokes?

I now have an Indian Chief Vintage, so am considering the same conversion.
 
#6 ·
I actually bought an Outex kit as well, but didn't feel like I could install it with the rust that is on my rims. I have it listed for sale here, so if someone wants a complete kit...let me know. I am planning on getting aluminum rims put on at some point and would use it for that.
 
#8 ·
Tubers are underground


The tire is capable of being tubeless but the wire wheels make it necessary that it have a tube. Most tires can be tubed or tubeless; it is the wheel that determines whether tube is needed or not.

Your tire is tubed. Your wheels should be lubed. Your wife or girlfriend showed be wooed.

Very hard to keep all that straight.
 
#12 ·
Bob, the pic appears that way because Seal All dries a rusty colour, but there was no rust on the nipples. I did have to grind part of the heads off as per Outex application directions, and I agree it seems a bit risky. Somebody mentioned water getting in under the adhesive eventually and I suppose that is a concern, but my bigger concern is spokes snapping at the nipple.:surprise: Time will tell.

If I get a couple of years out of this mod I'll be happy. I want to buy lighter wheels eventually but I just spent a bunch on FCR39's, ARK, 813 cam, clutch, and brakes this year and I had to stop the bleeding somewhere.

As Ashley mentioned, my main goal is to have tires I can plug on the side of the road if I happen to get a puncture when I'm way out in the middle of nowhere. A secondary concern is the stories I've heard about RAPID deflation when tubes blow. I realize this is an unlikely event but it's still something I'd rather not experience. Then there's the claim that tires run cooler and last longer without tubes and the alleged performance gain from shedding some rotational weight, but I must say having just lifted these and felt the weight, these wheels could only be heavier if the rims were made of lead so I doubt losing a few grams of tube weight will be all that thrilling.

I am stoked to be trying the PR4's on a Bonnie because they absolutely transformed my VFR. Incredible grip and they don't even flinch if you get caught in the wet. Plus they should last twice as long as the SD's I'm used to.

Now here's my piss off of the day: I went to go put the wheels back on the bike now that I'm sure they don't leak, only to discover the tech who mounted them put the rear tire on backwards. :brick
 
#16 ·
Now here's my piss off of the day: I went to go put the wheels back on the bike now that I'm sure they don't leak, only to discover the tech who mounted them put the rear tire on backwards. :brick
The way to avoid this is to put big arrows on the rim, showing the direction of rotation. Put the arrows on masking tape to make it easy to remove.
 
#14 ·
If you didn't take much off of the nipples it should be okay. And someone said water will eventually get in. That would mean it was leaking. So I doubt it. What I thought I saw was a nipple that was rusted away. I didn't look at it on my computer just my phone so I didn't really get a good look. And a bad thing about tubes is if you get a nail and ride a short distance to find a safe place to get off the road, the tube will get ripped and can't just be patched. Must be replaced. Tubeless is better. I've plugged lots of car tires. But that is considered a no no now. We take them off an patch them. I still plug mine. As far as the tire being backward I think I would just ride it. Unless it's no big deal to get it reversed. Tire direction is a bigger deal on a dirt bike knobby tire. Keeps the mud from packing in the tread.


Sent from Motorcycle.com Free App
 
#15 ·
I have plugged many car tires and ran them til they wore out with no problems . I have also done a roadside plug a couple of times with motorcycle tires . Although I did just do those as a temporary fix and replaced the tire soon after. Just not comfortable trusting a plug on 2 wheels
Image
 
#17 ·
Once had a new Michelin Pilot pick up a nail when it had less then 200mi on it. Plugged it with a rope type plug and rode it another 8k miles. I was nervous for awhile but later paid no attention to it. The closest shop was a Harley dealer and he told me to ride it to the shop, not going over 15mph and buy a new tire. BS.
 
#19 ·
Thanks for the write-up, looking forward to the update.

Would you advise against this mod for someone who knocks their rims out of true just about every time it's time to change the tires?

I would be concerned about the Seal All coming loose if the nipple rotates in the rim when truing...but to be honest I have never trued a rim with the tire off so I don't know if the nipple heads rotate in the rim at all when truing?
 
#22 ·
Oh the best thing is too have them rotating the right way. It is to direct water out to the side. But if not possible to correct it right away that wouldn't stop me from riding it. Just slow down in heavy rain. I think my front tire appears to be turning the wrong way but it isn't. The cuts in the front tire are backward. But the arrows are right. When I take my wheels in for tires I make notes which side the disc is on and the rotation.


Sent from Motorcycle.com Free App
 
#31 ·
Oh the best thing is too have them rotating the right way. It is to direct water out to the side. But if not possible to correct it right away that wouldn't stop me from riding it. Just slow down in heavy rain. I think my front tire appears to be turning the wrong way but it isn't. The cuts in the front tire are backward. But the arrows are right. When I take my wheels in for tires I make notes which side the disc is on and the rotation.
On bikes with identical front/back tyre sizes you can put the same tyres on both wheels as long as you reverse one of them, and if you compare a 'front' to a 'back' you'll often find they are identical treads but the 'direction of travel' arrow is reversed :)
This is because one tyre requires maximum grip for acceleration, and the other for braking, which are two different directional forces.
All fascinating stuff, but I don't think I'll get a second 17"x5" rear tyre on the front wheel of my Thruxton.
 
#23 ·
Just did the same thing over the weekend. Picked up an unused Outex kit here in the classifieds for $50! I used the kit alone, no extra sealing at the spokes and all is well so far (just 1 day). Time will tell, but I think all is good. See my post and pictures in the "What did you do to your twin today"
 
#24 ·
That's hands down the best mod I did this year. Holds air better than with tubes and no problems with leaks after 4000 miles and I've toured in high temperatures, and even did a track day the other day. I have no hesitation in recommending (tubeless) radial PR4's to anyone who likes to push these bikes. By comparison, the previous standard bearer SD's would've been toast by now and the PR4's look like they'll give twice the mileage easily, as I'd hoped.

Zen, did you grind the nipples to get the Outex tape flush? Interested to know if it works without that step.
 
#25 ·
Zen, did you grind the nipples to get the Outex tape flush? Interested to know if it works without that step.

I did not grind the heads down. I did go over them and the whole inside of the rim with 150 and then 220 grit sandpaper. Got all the rust out and smoothed down everything. Grinding was a bit more than I wants to do. Looking back at it if everything is smooth and doesn't protrude too far the tape can cover it. You just need to get a good zone of full stick and seal around each spoke. There is a little gap around each spoke in mine, but it's sealed all around that so it doesn't seem to matter. Also lots of smoothing the tape out with my tire spoon to get rid of any air bubbles. A few persistent ones had to be hit with the heat gun to soften things up and work them out.

I'll keep you apprised of how my install fares.
 
#26 ·
Steve Betts,

What size PR4s did you install? That's what I want to do - seal up the rims and install Michelin PR4's!!
 
#29 ·
Steve Betts,

What size PR4s did you install? That's what I want to do - seal up the rims and install Michelin PR4's!!
150/70/17 rear and 110/80/19 front. Not to be patronizing, just noticing you ride a Thrux - make sure you order an 18" front.

You will not outride these tires on these bikes, you'll scrape hard parts first. And if you get caught in the wet, no big whoop.

 
#27 ·
An interesting thread. So interesting that I contacted Woody's Wheel Works to find out about having the conversion made for me rather than mess around trying to get it right myself. Woody says "Nyet" They will not do a tubeless conversion on existing Bonneville chrome wheels because the sealant eventually will come loose. Their only solution was to re-lace their own aluminum rims to the Bonneville hubs to the tune of $1200 to $1300.

I guess I'll learn to live with and love the tubes. For that kind of money, i could almost pay somebody to follow me around with a repair van in case I happen to get a flat on the road!
 
#28 ·
I think you'll get that same answer from anyone who also sells their own wheels/rims. They are in the business of selling wheels right?

If the sealant does come loose you just have to patch it. Not a big deal. In fact I had to patch my sealant after install as I didn't get it quite right the first time. Not a big deal. The Outex kit comes with a bit extra so you can do a few patches if ever needed.

Before I did it I read a number of reviews on the Adventure Rider forums. They seem to be much more into this modification than your typical Bonneville rider is. Makes sense given the terrain they ride on is much more punishing and more prone to getting puncture. Much easier to plug your tires while out in the woods than to pull the wheel and replace a tube.
Also, if the method can hold up to off-road travel it ought to hold up fine for the typical riding a Bonneville sees.
 
#34 ·
I recently completed a tubeless conversion on my 2014 T100, utilizing the Seal All/Outex method detailed by Steve Betts in his original post. Here are my results.

Before I undertook this project, I spoke to techs at Woody's Wheel Works and, more extensively, Buchanan's. The primary purpose of my discussions was to understand if my OEM rims were suitable for such a conversion. It was explained to me by both techs that a key aspect of a safe conversion is the presence of the ridge on the upper edge of the rim, that helps keep the bead in place. Both the front and back rims of my T100 were manufactured with that ridge, as are almost all OEM rims these days whether they are intended for tubes or tubeless.

The secondary purpose of my inquiries was to understand the sealing process. This one is a bit more murky. Fewer and fewer rim shops are willing to undertake the task of sealing a customer's used rims; it's a liability issue, pure and simple. They don't know the history of the used rim, it could be weakened by many hits and/or rust, etc. They'll sell you their own new products, of course, done to their own specifications. Understandable, in this litigious day and age.

I then read every thread I could find on any motorcycle forum about sealing the spokes. Ducati forums, BMW R9T forums, Africa Twin forums, dirt bike forums, you name it. I came away convinced that sealing the spokes can be completed successfully in a number of ways, and that air escaping through individual spokes can almost always be traced to poor/hasty preparation.

Satisfied, I pm'ed Steve Betts with a few final questions, and he was extremely helpful. I therefore ordered the Outex tape from eBay and began the prep work. Incidentally, the Outex was ordered on a Friday, shipped from Japan the same day, and was to the western United States the following Tuesday. I was impressed.

I will reiterate what Steve emphasized in his original post. Preparation, patience, and cleaning are the key to a good seal. Unlike Steve's experience, I got my tires off and there wasn't a single speck of rust in my rim. Nothing. It looked brand new even after two years. Advantages of riding in a warm climate, I suppose. I went straight to work with the grinder and removed enough of the heads as to leave maybe .5-1mm above the surface of the rim. In other words, I did not grind them down to be completely flush. I then sanded with #200 and #100 to smooth out any sharp edges. I cleaned the surfaces with compressed air, alcohol, more compressed air, more alcohol, and then did it again.

Steve's instructions on the Seal All application were spot-on. I did 3-4 at a time on the rear rim, let those set while I did 3-4 on the front, and back and forth. I think Seal All is a great product for this application, as it cures quickly but doesn't dry hard as a rock, it has just a little flex to it. My first application was conservative and thin, and I let it dry for 48 hours before I applied the next coat.

Because I was curious about how well I'd done the sealing, I mounted my new tires and went to the bathtub to check for leaks. Nothing. Not a single bubble anywhere. Some could argue that I'd done enough and could stop right there. To me though, the redundancy of the Outex tape seemed like a no-brainer.

So, I took off the tires, let the rims dry out, cleaned the surfaces again, and applied the Outex tape. Nothing special to note, their directions are pretty clear. The front rim was a bit tricky for me, as the tape is wider than the channel, and you'll want to keep the tape centered to ensure a good seal on the spoke heads that touch up against the ridge. Outex recommends mounting the tire and inflating to 3.0 bar as soon as possible once their product is applied, as the pressure helps to seal the tape to the rim. I had my tires on within a half hour of installing the tape. 24 hours later and the rims/tires were back in the bathtub for extended observation. No bubbles.

After letting them sit for 5 days, neither rim had lost even half a PSI. So yesterday, I mounted 'em up to the bike and went for a cautious ride, checking the air pressures every 15 minutes or so. Still holding steady.

Obviously, this isn't a long term review (yet). I'll update from time to time. Big thanks to Steve for answering my questions, and to all those on all the different forums who took the plunge and outlined their experiences.
 
#36 ·
I've been running OuTex tape on the rear wheel of my Thruxton for about two years and the front for six months with no issues/leaks. I didn't grind down the spoke nipples and it's still working. I ride to Big Bend twice a year and don't want to deal with pulling off the wheel and dismounting the tire to patch/replace a tube. It's a lonely, desolate place out there. Help is not just around the corner. Simply putting in a plug and airing up the tire is a lot more attractive. :thumb
 
#38 ·
This sounds like a nice solution, well done!

Just one thing - did you safety wire tie off the rear spokes just in case one of them breaks?
As you know, a broken spoke can hit the rear brake caliper on it's way around and get shoved into the tire. On my '01 bike it marked the inner tube but didn't cause a flat - others have not been so lucky. With tape, I can only imagine it would push the tape off, or punch a hole in it.

I highly recommend the safety wire or cable tie treatment to the spokes on the rear wheel with this conversion.
 
#39 ·
If this seriously concerns you then you should have them tied on your bike as standard. Apart from the fact that ties are used for off-road, where spokes are known to snap, the likelihood of a spoke puncturing your tyre is minuscule compared to that of a nail, the probability of an inner tube *saving* the wheel from rapid deflation is equally unlikely. If a spoke goes through a tyre wall there's a 99% chance it will puncture the tube. If that happens, as we all know, we get rapid deflation.
If the same thing happens on a tubeless conversion, you could argue that there's a 1% less chance of a puncture, but there's also not going to be a rapid decompression so there's a far far greater safety factor.

You were incredibly lucky to have a 'marked tube' and not a shredded tube. It's such an amazing obscure and unlikely outcome.

I'd suggest that the tubeless conversion reduces the need for safety wiring, rather than increasing it.
 
#41 · (Edited)
I agree with RichBenAZ.. As I read his post #37 he is not concerned about a broken spoke pushing through a tier, but rather pushing through the sealing tape, causing rapid deflation. I think the sealing tape is thinner and most likely less resistant to a spoke nipple sticking through it than a tube. For that reason safety wire is not a bad idea.
 
#44 ·
OK, yes, that makes more sense, so he probably meant was it hit the tube, not the tyre.

My point wasn't that spokes never break, it's that when something punctures a tube it deflates very very fast. When something punctures a sealed tyre it deflates much more slowly. The sealing tape is far thicker and stronger than a rubber inner-tube, but regardless of that, this whole argument revolves around the idea that replacing a flimsy inner-tube sealing in the pressure with a tubeless system is somehow more likely to fail if a spoke snaps and pushes inwards?

Suggesting that a spoke nipple might push through it is a bit unlikely, as firstly that's not what usually happens when a spoke snaps, and if somehow it did, an inner tube would generally burst immediately. If it only 'left a mark' on a tube then my guess is that it tilted, as tubes are pretty pathetic things and burst instantly when there's any intrusion. In this situation I would strongly suspect tape would simply delaminate slightly around the spoke, and nothing would happen. This isn't sellotape, it's thick and strong material, which is significantly stronger than inner-tube rubber!

But this is all unimportant. If you feel the need to tie the spokes, go for it, but to me the suggestion that everyone should do so because a tubeless conversion has made it more dangerous is alarmist and misleading.