Triumph Rat Motorcycle Forums banner

T120 Tank Badge Removal and Swap.

36K views 43 replies 24 participants last post by  Baster  
#1 · (Edited)
Just swapped-out my factory badges for the sexy 4-bar badge. I like to keep all the original stuff just in case, so here's a quick walk through with pics of the whole job:-

Needed:-
Some popsicle sticks
Small craft knife
Hex driver for original badge 4mm ( at least I think it is? )
Meths or alcohol
Hot hair dryer.
Maybe some acetone, but not strictly necessary.

Sharpen a couple of popsicle sticks chisel-fashion and use the hair dryer to get the badge hot enough to be just almost uncomfortable to touch .
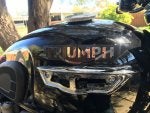
Use the small hobby knife to gently prise up a corner of the badge inlay. This is a thin sheet metal inlay which is printed with the Triumph logo and it is retained by grey double-sided tape.

Once the corner is lifted, gently slide the popsicle sticks along under the perimeter of the inlay and apply more heat if needed. Just work along gently and avoid creasing the inlay.

Eventually you'll get there and expose the main badge retaining screws . Undo these and prise the badge off from inside so as to avoid paint damage.
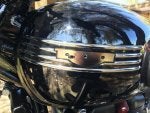
You should now have intact original badges that can be kept or displayed in the man-cave, or woman-den , whichever it may be.
 

Attachments

#3 ·
4-Bar Installation

Get your new badges over a clean ,non-dusty surface and push the Triumph logo insert out with a pen or similar. These are held in for shipping with temporary adhesive but the double-sided tape backing may detach too, hence the clean surface.
This temporary adhesive is almost impossible to remove mechanically so a bit of acetone nails it , but take care not to damage paint-work with this stuff.

Now clean the tank sides with meths/alcohol and finish off with the isopropyl alcohol wipe supplied with the new badges. Do not skimp on this as the 4-bar badges are retained by double-sided tape only.

Ensure you have the correct side and offer the badge up for a test fit before removing the tape backing. A pin locates the badge on the rear screw hole and a sight window locates it in relation to the front screw hole - see attached image.

When you are happy remove the backing and fit the badges, rubbing them on with a soft cloth. Fit the inner logo and you're done!

I hit my tank and all other brightwork and even the chrome with Turtle Wax Black detail spray to finish.
Enjoy! :grin2:
 

Attachments

#11 · (Edited)
Swapped mine as well. Picked up the Matte Black version (even though they look silver in this photo due to the sunlight). The dental floss worked perfectly for quickly separating the old badge bodies from the tank. I removed mine without applying any heat, although, it was a 90+ degree Texas day. Just need to figure out what to do about these side covers. I really do not like the graphic design that was used. Has anybody had their stock side covers stripped and powder-coated or anything like that? I was thinking that a nice plain black would be nice.

Image
 

Attachments

#12 ·
Great job Chaps! It would be nice to get some alternative side-covers to play with, and another tank.
I fancy doing a silver-leaf teardrop on the bike and matching old-school graphics on the side covers.

My original tank has enough wear and tear that it wouldn't break my heart to paint it up eventually.
The factory side covers should paint up easy enough too but replacements are big dough !
 
#14 ·
Thanks for the write up, Baster. I did everything but sharpen the popsicle stick.:D
 
#18 ·
I almost went with the vintage finish badges but I couldn't find any photos of them on a bike.
 

Attachments

#24 ·
Why not just fit it if you like it? The new Bonnevilles nod at tradition, but in reality are a totally different beast in every possible way , so it could reasonably be said that that particular horse has long since bolted. :) But that's just my opinion.:geezer
 
#25 ·
IMHO Triumph scored platinum continuing the ‘Street’ brand and having the Street Twin designation running alongside the Street Triple, despite the differences between the two bikes.
They’ve revamped the bike and should have revamped the name. I’d have suffixed Street Twin with 1200 and lost the Bonneville name and the T120 moniker to avoid all the irrelevent journo rose tinted comparisons and left the Bonneville name where it belongs. Try finding a review that doesn’t waste column inches going through the inevitable irrelevant cliched comparisons.


.
 
#29 ·
I'm guessing that's the same badge that mrchev had on his 2001 T-Bird. TriRocket3 has a Bobber with a T120 tank fitted.:pC
 
#31 ·
That makes me wonder whether the T100 badges are really the same badges that are fitted to the new Speedmaster.:|
 
#33 ·
I like the 4 bar badge, chrome on mine. Also like the way it covers the bottom of the black stripe against the white. Always thought it looked a little weird just stopping in the middle of the tank where it hit the white. The stock badge showed all of that, this one gives it a natural break.
 

Attachments