Triumph Rat Motorcycle Forums banner

Wiring cable size to use?

48K views 39 replies 12 participants last post by  tjkoko  
#1 ·
I'm at the point of ordering wiring products for my T140 project. Vehicle Wiring Products looks to be the best place to get everything, but there's a big range of cables to choose from. The standard fuse is 35A which seems massively high but there must be a reason.

The question is, which current rating of cable do I need? There is 11A, 16.5A, 25A, 33A, 39A. I intend to use Japanese type 'uninsulated' connectors (these have clear plastic insulation sleeves). So whatever cable I get needs to fit into those properly.

The bike will have a 3-phase high output alternator with a Podtronics type regulator/rectifier, points ignition, a Yuasa burglar alarm battery (I think it is 2.9AH or thereabouts), no indicators and just basic headlight (maybe 60W main beam)/pilot light/tail light/brake light/horn. And oil pressure warning light, and speedo & tacho lights.

So if I'm riding at night with 60W main beam, 10W worth of clock lights, whatever the tail light is (10W?) and I'm braking (another 20W), and I have to use the horn (no idea - 40W?), that might add up to 140W? Call it 144W and that's only 12 Amps. So, by my logic, 16.5A rated cable ought to be more than adequate?
 
#2 ·
I'm at the point of ordering wiring products for my T140 project. Vehicle Wiring Products looks to be the best place to get everything, but there's a big range of cables to choose from. The standard fuse is 35A which seems massively high but there must be a reason.
Once you spec your cable size, how will you go about building the loom?

Will you replicate wire for wire from the original loom, or do you have a map indicating lengths/colors and so forth?
 
#3 ·
It won't be much like the original Rod. I'll make it up as I go along - figure out what needs to go where, offer cable up, cut to a little over-length first, and when I've got it all as neat and simple as possible, I'll use some black flexi sheathing, then do the terminals etc, and that will be that, I hope. As far as I can see, I'll only need 3 wires running from the front end to below the seat (a wire to feed the ignition switch, a wire from there to the coils and a wire from the light switch to the tail light). There'll be a bit more going on inside the headlight shell and under the seat but shouldn't be too much. I will use the frame for the earth return wherever possible - and before some members shout me down on this, I've done wiring like this before (on my B50) and it worked a treat for the 20,000 miles I used that bike! I will make an earth cable to run from the headlight shell to the front of the frame (horn bracket probably).

Before this slides off the tracks and into a debate about everything I'm doing wrong (not aimed at you Rod, just generally), my query is about what type of wire (or cable) I should get. I mean, what thickness / amp rating? That's about all I would like to know at this stage!
 
#4 ·
What you're going to have to do is calculate the amperage draw and the length of wire on each given circuit. Then you will be able to determine what gauge of wire would be needed. I think I am too technically challenged to put links in this posting, but after a quick search I found a couple of easy to read charts and easy to use, watt/volt/amperage, Calculators. By what I figured most circuits ( lights etc.) will use 18 g. Wire. Horn and main battery charging will probably be larger wire ( smaller # ) I'll try to include a chart, but if nothing shows up, you're on your own there.

Alan.
 

Attachments

#9 ·
The table comes out a treat Alan, thanks for this. Checking it, I can see that 18 gauge will suite everything on the bike. There will be no wires over 7ft long and no components drawing more than 15 Amps (or even close to that - 15A = 180 Watts at 12V).

Not sure how the American Wire Gauge system converts to the sizes I'm finding on the site's I've been looking at, but if I can find the equivalent, I'll know that type will do everything I need.
 
#5 ·
Hi John - I'm going to be making my own loom soon for my TR7 Tiger Trail so I am interested in how this goes.

I'm going to be using the Motogadget M-Unit and was going to get a wiring 'pack' from motogadget but they seem not to make these anymore. I'm attracted to the simplicity that you can achieve using the M-Unit as this will be my first attempt to build a loom from scratch.

Best of Luck - I will be lurking in the background!

Cheers

KitKat
 
#7 · (Edited)
I made up a custom wiring harness for my T120R. That was quite involved with all the usual lights and indicators, a three phase alternator, Podtronics rectifier/regulator, electronic C5 ignition and Smiths electronic instruments. I also installed a 4 way fuse box. The standard harness was no use at all so I started at the back and worked my way forward. The wires were wrapped in 'Tesa' cloth harness tape to give a very nice, neat harness. I also used the Japanese style bullet connectors wherever possible.
I also bought good quality crimping pliers... they made it easy and I would recommend that you do the same.
 
#8 · (Edited)
Hi John,

Vehicle Wiring Products looks to be the best place to get everything,
current rating of cable do I need? There is 11A, 16.5A, 25A, 33A, 39A. I intend to use Japanese type 'uninsulated' connectors
I use Japanese type 'uninsulated' connectors on Jap bike rewires but I don't recommend 'em as a starting point for deciding cable sizes, because the maximum multi-way connection is only 4-way.

Otoh, the maximum multi-way connection with 3/16" (aka "4.7 mm." or "5 mm.") o.d. bullets is 8-way, which I make use of for the "earth" network connections.

Crimp-on bullets are available to fit 1 sq.mm. conductor, which would match your selection of 16.5A wire; in practice, that's "thinwall" cable and, ime, they don't work.

Also, you are very unlikely to buy Britbike components with "Japanese type 'uninsulated' connectors", so you would have to change the connectors on any component; if it didn't work, you'd have to cut them off and fit original-looking terminals before you could return the component to the seller.

what thickness / amp rating?
In addition to VWP, I use Autosparks. In addition to all the thinwall sizes, they also sell all the 'normal'-PVC-insulated cable sizes; fwiw, I generally use:-

. 9/0.30 (9 strands, each 0.3 mm. o.d., equates to 0.65 sq.mm. conductor) for individual component supply and return wires; this is rated for 5.5A so, at a nominal 12V, is good for components up to 66W (i.e. even a standard quartz-halogen main beam).

. 14/0.30 (1.0 sq.mm. conductor) for individual component supply wires where the colour combo. isn't available in 9/0.30, or where the component draws more than 66W (e.g. 100W main beam :D).

The above two are 'normal'-PVC-insulated and the crimp-on bullets for those sizes work.

. 28/0.30 (2.0 sq.mm. conductor) 'thinwall' for multi-circuit cables like the Brown/Blue from battery -ve, White between the ignition switch and the individual components' White wires branch and Red between the multi-way bullet connectors in the headlamp shell and under the seat, including to battery +ve. The crimp-on bullets for 2 sq.mm. conductor work on this wire. :thumb

The standard fuse is 35A which seems massively high but there must be a reason.
Fuses have two possible ratings - 'continuous' or 'blow', 'blow' being double 'continuous'. Only British cylindrical glass-'n'-metal fuses are rated 'blow', which is what the "35A" is. I strongly recommend that you do not use this type of fuse. Use the more common automotive blade fuse; there isn't a "17.5A" of these but 15A is more than adequate.

As you're using a Podtronics reg./rec., you'll connect this separately to the battery from the Brown/Blue and Red wires supplying the bike's electrical components. As the Pod will be connected to a 3-phase alternator(~14.5A @ 5,000 rpm), I recommend fusing one of the wires between Pod and battery with a 20A blade fuse.

Btw, in addition to small fuse boxes, there are several types of individual blade fuse holder that can be clipped together. I use these in preference to a fuse box, including unwired fuse holders to store spare fuses.

What you're going to have to do is calculate the amperage draw and the length of wire on each given circuit.
Length of wire is irrelevant; all the wire sizes listed have resistance in hundreths or thousandths of an Ohm per metre, and the longest wire is from pilot to tail lamp and less than three metres.

The formula to connect Watts, Amps and Volts is Watts = Amps x Volts, aka P=IE.

Hth.

Regards,
 
#10 ·
Some really useful responses, thanks everyone. VWP sell a kit containing a load of terminals & insulation sleeves together with the proper F crimp pliers. The Japanese type kit works out at about ÂŁ28, the British type about ÂŁ30, so good value I reckon.

That's some great detailed info Stu, hth? yid!
 
#15 ·
Gratuitous fact-spewing is just your 'thing' I guess Stuart. I should get used to it and not let it wind me up. Can't help but find it annoying sometimes though. And I very much doubt that it helps promote better understanding - there's such a thing as too much information.
 
#16 ·
Hi John,

I've recently rewired my Trident from scratch. Here are some modifications that I made over the original wiring, which you might like to consider:

  • As others have said, go for a blade style fuse box.
  • Use the old rectifier mounting point as a single earth/ground point.
  • Switch to negative earth - far easier to find -ve earth LED bulbs.
  • Use relays to switch the headlights.

Here's what the under seat area looks like now:


I too used Japanese bullet connectors - they're a lot nicer than the old Lucas bullets.
 
#30 · (Edited)
Hi Rocky,

Switch to negative earth
earth cables
Shouldn't they be green?
The British wiring standard sort-of followed by Lucas says Red for 'positive earth' cables to battery +ve and Black for 'negative earth' cables from battery -ve.

Honda use Green for their ('negative') earth cables.

Are there a set number and length of colored wires I should source with final cut to length on installation?
Make up a list from the wiring diagram. The British suppliers I use (Autosparks and VWP) supply in metres: two metres is more than enough to go from underseat area to headlamp area with some left over, three metres is more than enough to go from headlamp area to rear lamp area (e.g. the Brown and Brown/Green, from front brake lamp switch and lights switch respectively to rear lamp) with some left over.

Extras I order are (if you're using the same cable sizes as me):-

. 6m of White 9/0.30; 1m of White 28/0.30 thinwall for the cable between the ignition switch and the branch of individual component White 9/0.30 cables.

. Because I've stuck with 'positive earth' (no trouble finding LED?): 6m of Red 9/0.30, 2m or 3m of Red 28/0.30 or 44/0.30 thinwall (see reason below); as well as between the 8-way bullet connectors, I use this from the headlamp to the front 8-way and battery +ve to the underseat 8-way.

. 6m of Brown 9/0.30 (because you need enough to do both front and rear brake switches to the rear lamp).

Is the headlamp a good place to terminate a number of earths from which a common earth wire could be run back to the battery area?
Most electrical components are either around the front or under the seat. I use an 8-way standard 3/16" o.d. bullet connector (4 cables in each end) in the headlamp shell and under the seat; individual components in each area are connected to the 8-way (same principle as "bucksfizz's" picture).

The two 8-ways are connected to each other by a length of the aforementioned 28/0.30 or 44/0.30 Red thinwall with a common connection on an engine head stud or bolt.

Do I replace the single fuse with a number of fuses or do I augment the main fuse subset fuses?
It's a vexed question.

Ideally, as well as the main 15A (blade) fuse and an appropriate fuse in one of the cables between reg./rec. and battery, you'd add appropriately-rated fuses for a number of circuits - so, say, a disconnected connection in the tail lamp doesn't blow the single fuse and bring the whole bike to a halt at the wrong time/place.

Snag is - in reality - the split between, say, the White from the ignition switch and the individual component White cables is in the headlamp shell; do you put fuses in the headlamp shell, or run lots of cables from the headlamp shell to a fuse box under the seat, say ... then all the way back up to the components around the front of the bike ...?

Fwiw, I've trusted a bit to luck, only putting a fuse in the White/Yellow between the kill switch and the electronic ignition, because the latter is also under the seat. So far, so good ... :whistle

Headlamp main and dip are fused, but only because they're supplied through relays, and I can buy relays that take a blade fuse. But my bikes have 100W-main-beam headlamps, it's debateable whether the 5A draw of standard 60W-main-beam warrants the complication of relays ...?

Do I run individual wiring using straps but cover them only where they're visible with split tubing?
I've never taped a loom I've built; one of the things that prompted me into my first rewire was lack of access to damaged cables under the tape of the original loom. :mad: Afaict, the only reason for taping a loom is to keep it together during transport and storage between building and fitting?

Otoh, I build looms on the bikes. Releasable reusable cable ties are useful for keeping routed cables off the floor, what's the point of then faffing around with hanging cables (because you have to release the cable ties to fit the tape) when you have a nice neat harness attached to the bike? :confused:

I use single lengths of split tubing to cover groups of cables still exposed after the tank, seat and sidepanels are refitted. As I say, e.g. the wires still exposed between the front of the tank and the headlamp shell. Or I might have built the harness tying cables to the frame tube under the seat, but the refitted seat's front hinge squashes some of them; I release the cable ties here and keep the cables protected and tidy inside a short length of split tubing. It's one of these things that's difficult to explain but blindingly-obvious when you actually build a loom. :D

I wiring diag looks daunting.
+1. But a trick to remember is nothing works without the battery. So start with the Brown/Blue and Red ('positive earth') or Black ('negative earth') cables from there?

To avoid the possibility of short-circuits caused by loose cables connected to a live battery, I have a local timber supplier cut a block of wood to the same size as the battery; I can get steel inserts that screw into wood and have a M6 thread in the centre, so I can use the standard battery terminal screws, but there's nothing to stop you using just self-tappers straight into the wood?

A trick I've known others use is to blow up a manual diagram to, say, A3, colour in the black lines with the correct colours and pin it on the wall beside the bike. Tick off the cables on the diagram as you install them.

Or use computer software to colour in the diagram, e-mail the file to the local print shop and have them print it as big as you want?

Finally here, if you can find the Clymer workshop manual for your bike, aiui the wiring diagrams were originally printed in colour. :thumb

I also need to study the legacy loom to get some understanding.
I found that helpful in my first rewire. I stripped off all the tape, connected the AMP plugs (still in place at that point) to the handlebar switch cluster cables through the headlamp shell grommets and hung the other ends of the main loom cables from a garage roof truss above the front of the bike. Wiring diagram in Glorious Technicolour! :D Then I took each cable, threaded it through a headlamp grommet and cable-tied it to the bike's frame and reconnected it to the component (can't do this with the Red cables as they're far too long and convoluted without the loom tape :(). Then I replaced the cables I was planning to replace with thicker, shortened some others (don't forget to turn the steering to opposite lock :whistle) and built the 'earth' cables network as above. :thumb

In terms of motorcycle, and in particular, Triumph cable color coding, I'm totally in the dark.
Google "bs au 7". In the early 1960's, Lucas - as the only British automotive electrical supplier left - wire colours became British Standard Automotive No.7 (subsequently superseded by BS Au 7a and BS Au 7a:1983 afaict). Luckily for you, the BS (unfortunate abbreviation) themselves aren't on-line, the links you'll get are to various old British vehicle owners' clubs' websites. They are of some use - Lucas continued to supply motorcycle makers with Brown/Blue for the main cable between battery and ignition switch, rather than the plain Brown in the Standard; so the Standard has a different colour combo. connecting brake lamp switches and lamp(s); other types of vehicle don't have multiple coils connected to multiple sets of points, so Black/Yellow and Black/Red are something else in the Standard; etc., etc.

Otoh, the Standard can be useful if you're planning to add things - e.g. as I fitted relays to supply the headlamp, I used different but standard colour combos. to differentiate the switching cables to the relay (same as the handlebar dipswitch wires) from the supply cables between the relay and the headlamp filament. Most (all?) BS colour combos. are available, so it saves you thinking up a 'logical' colour combo. for your new addition, only to find it doesn't exist ...

During my first rewire, I became convinced it was all going to go horribly pete and I'd need a proper auto-electrician to sort it out, so I stuck to standard colours and combos. that anyone familiar with Brit. vehicle electrics would recognise. Touch wood, and possibly because I still do every first switch-on outside, without any bodywork fitted, jump-leads from a separate battery to the wood-block terminals (so a jump lead can be simply pulled off) and a fire extinguisher nearby, I've yet to see and smell the bubbling of burning wiring ... There, that's well-and-truly hexed my next rewire ...

Hth.

Regards,
 
#18 ·
Very neat, both of those bikes. Mine should be less involved as it really will be minimal, but it has occurred to my slow brain that, if I only need 3 wires running to/from under-seat to front end, it won;t harm to add a 4th, which can be a heavier earth wire, taken to somewhere under the seat as suggested.

Any idea what kind of wire you used, B'fizz and P'see?
 
#19 · (Edited)
For most of the wiring (indicators, ignition, relay switching, etc.) I used 1.00mm² thin wall cable. For anything that used a very low current (LED idiot lights) I used 0.75mm². For the head lamps I used 2.00mm², and these wires are driven by the relays. These wire sizes are probably a little overkill, but too big is far better than too small. At the end of the day, there aren't that many wires, so big is best.

My wires:


I tried to stick with the traditional wiring colours, but deviated from standard for the indicator wires (I used orange).

Headlamp:


Head lamp relay harness:


I did use Lucas bullets for this item, as I wanted to use a double connector.
 
#24 ·
I buy most of my bike wiring gear from Vehicle Wiring Products
The thin wall 0.5mm cable is rated at 11amps and will be adequate for most circuits
Best to split things up, ignition/lights/horn/indicators etc, mostly 10A circuits

Those bullet connectors with insulated sleeves are what I use, get the ratchet crimpers, as opposed to the gripped ones. Larger blade connector block for the 5 cable regulator rectifier connection.

I like the look of the braided sleeving mentioned earlier in this post, also available from RS Components and Farnell is braided shrink wrap sleeving, this is neat stuff. Not sure about flex inslulation, I presume you mean stripping the cores from pvc/pvc flex? If so, the cores don't run parallel, rather they spiral, and the insulation is formed arround them. Threading new wiring through this seems a waste if effort when heatshrink is neater.

On the layout,I think it's best to split the systems into groups, run the individual conductors to the relevant points, wrap, then terminate. The more time spent planning/ routing/ fixing the loom the better the end result. I've spent days and days on various bikes over the years.

Groups would be

Charging: stator to connector to rectifier to ignition switch-link to battery
Ignition switch to fuse box
Fuse box, to kill switch, ignition
Fuse box, to light switches to lights
Fuse box to brake light switches, to brake light
Fuse box to horn switch to horn

All neutrals or earths if you prefer, connect to the frame at local points front and rear of the bike frame.

As we have, one I did earlier photos, here's my T140
Image


I know you mentioned the 1mm 16.5A rated cable, I started using this on my bike, the thinking was more mechanical than electrical. Bigger cable, larger insulation, greater mechanical strength. Ended up re doing the loom with 0.5mm as I am running cables up the head stock(not standard t140) and internally in the bars to flush switches.

Hope this makes some sort of sense

GS
 
#27 ·
Stu.

You could probably knock up a wiring loom blind folded.

For one who has never considered such a task until they took on a barn find, how would you go about tackling it?


Variables which escape me:

Are there a set number and length of colored wires I should source with final cut to length on installation?

Is the headlamp a good place to terminate a number of earths from which a common earth wire could be run back to the battery area?

Do I replace the single fuse with a number of fuses or do I augment the main fuse subset fuses?

Do I run individual wiring using straps but cover them only where they're visible with split tubing?

I wiring diag looks daunting.

I also need to study the legacy loom to get some understanding.
 
#32 · (Edited)
Relays

Hi Rocky,

A relay is a simple on/off switch; however, because it's an electro-magnet (rather than a lever, button, etc.):-

. It's switched on and off by something else - my uses are simple so I operate them with the handlebar switches (mainly).

. By different internal connections, a relay can be configured to do different things when it's on and off.

. It allows the electrics designer to let a user operate a heavy current without bringing the heavy current anywhere near the user. The example that you're likely most familiar with is a car electric-starter - you've seen the thick cables between it and the battery, but they don't run to the ignition key switch, and the switch itself doesn't have to be hefty to switch the starter current itself; essentially, the key switch just switches a relay (usually somewhere in the engine compartment), the relay makes the actual connection between battery and starter and away it goes. :thumb

Standard relay:-
Image


The electro-magnet is the oblong symbol between terminals 85 and 86; say, for the sake of argument, this was a starter relay:-

. The ignition key switch would be connected to either 85 or 86 and the other terminal would be 'earthed'.

. The supply from the battery to the starter would be connected to 30 and 87.

. When the ignition switch is turned to 'Start', it operates the relay electro-magnet (very small current, milliAmps usually); the relay electro-magnet operates the relay switch to connect battery to starter. That's why the thick starter cables don't have to go all the way up the steering column to the ignition switch itself.

. When the engine starts, you release the ignition key, the switch springs back to something like just an 'On' position, the current through the starter relay electro-magnet is cut, it no longer maintains the connection between 30 and 87 so the starter switches off.

Relating the above to, say, the bike's headlamp:-

. The original headlamp (main) was either 45W or 50W.

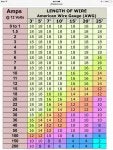
. This current - ~4A - travels from the battery along the Brown/Blue, jumps the ignition switch contacts, travels along the Brown/White to the toggle switch, jumps the switch contacts, travels along the Blue(?) to the handlebar dipswitch, jumps the switch contacts, travels along the Blue/White to the headlamp bulb.

. As I was increasing headlamp main to 100W, I was doubling the current to (a little over) 8A (and might've increased it again to 10A for twin 60/55 headlamps). Problem I had without relays was the extra Amps would be travelling down the same cables and leaping the same switch contacts as the Amps for everything else; increasing some cable sizes wasn't a problem, but others (e.g to and from handlebar switch clusters) would be, as would the various switches themselves. And the main fuse would have to be even bigger, offering even less actual protection to most circuits. :eek:

. Otoh, if I installed a separate supply direct from the battery to just the headlamp, incorporating relays for main and dip (the relays switched by the handlebar dipswitch), it could be fused to suit just the headlamp consumption, and remove a hefty current from the main loom components. :doublethumb

their "function/position" in the circuitry and suitable relays to buy?
But, if you're only planning to fit a single 60/55 headlamp, note I posted, "it's debateable whether the 5A [i.e. at most, 1.5A more than standard] draw of standard 60W-main-beam warrants the complication of relays ...?"

Nevertheless, I've done it on my T100 and the relevant components are the same on your T140:-

. My T100 was fitted originally with a thicker Brown/Blue than the original on your T140; if you intend to follow my advice and fit a 28/0.30 thinwall cable, it's 25A rating will be more than adequate for all the current, as will a 15A blade main fuse.

. My T100's ignition switch is a late (but pre-Wassel) proper 'genuine' Lucas with four male tab contacts in two physical pairs. So I have the Brown/Blue to one tab and the headlamp relays' supply from the other physically-connected tab, so the headlamp current itself doesn't pass through the switch itself.

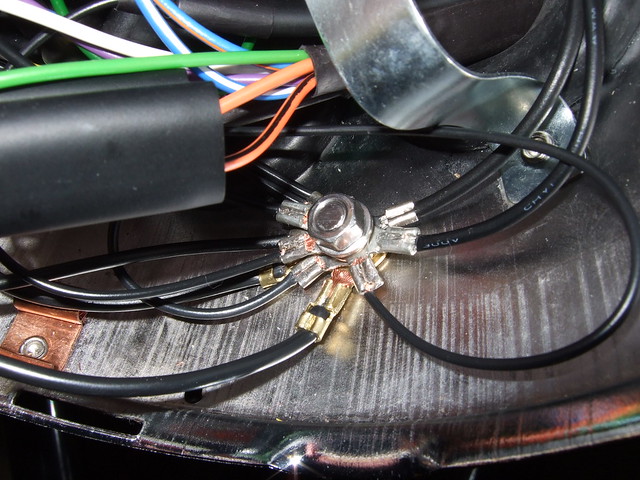
. I've been able to fit the headlamp relays in the standard 'half-egg' shell (with an ammeter as well as the toggle switch ;)).

. Standard on/off relay with fuse in component supply between terminals 30 and 87.

. Standard on/off relay without fuse.

. I use one of these on each relay to keep the individual connections together and in the correct orientation.

. If you're worried about space in the headlamp shell, you can use micro relays but they don't have the option of an individual fuse and, ime, you definitely need one of these to keep the individual connections together.

Note all the above are standard relays; as well as being used in other vehicles, you can get 'em from electronics sellers, either bricks-'n'-mortar stores or Ebay, no need to order from GB or the US.

. Assuming standard 'positive earth':-

.. Blue/White or Blue/Red is connected from the handlebar dipswitch to terminal 86 on a relay;

.. Red is connected to terminal 85;

.. battery supply is connected to terminal 30;

.. using BS Au7 colour combos.:-

... Blue/Slate (Grey) or Blue/Black from main-beam relay terminal 87 to headlamp;

... Blue/Pink or Blue/Orange from dip-beam relay terminal 87 to headlamp.

Final two thing to bear in mind:-

. Using the Brown/Blue from battery to ignition switch for the headlamp supply is only suitable for a 60/55 headlamp; if you plan to fit a higher-Wattage one - or keep the dip on when main's on (modern automotive fashion) - you need a completely-separate fused supply all the way from battery to relays.

. Do it as above and, if it all goes horribly pete, just disconnect the headlamp dipswitch Blue/White and/or Blue/Red from the relay/s, connect it/them directly to the headlamp and it'll all work as normal. :thumb

Hth.

Regards,
 
#33 ·
Very detailed Stu.

Thank you for your time and expertise.

I'll concentrate on the standard featured wiring loom with the superior cabling and extend to relays when I've got the basics sorted.

This will be a great reference.

Can I ask why "thinwall" cabling is preferable?

Is "thinwall" a reference to the thickness of the insulation?

If so, doesn't thinwall make terminations/terminals a little on the floppy side?
 
#34 ·
Hi Rocky,

why "thinwall" cabling is preferable?
At 28/0.30 and larger, I find the 'normal' cable a bit more difficult to work with, because of the insulation thickness. Also, thinwall has a higher rating for the same conductor cross-section - e.g. 28/0.30 is 2 sq.mm.; normal is rated for 17.5A, thinwall for 25A.

Is "thinwall" a reference to the thickness of the insulation?
Aiui, partially; it's a different plastic, which can be thinner while providing increased insulation.

doesn't thinwall make terminations/terminals a little on the floppy side?
28/0.30 and above is exactly the same conductor - cross-section, strands, etc. - normal and thinwall; terminations/terminals work on the conductor, not the insulation.

It's when you go to 1 sq.mm conductor and below that the conductors change (1 sq.mm. thinwall is 32/0.20); I've experienced problems with terminals that rely on friction alone (e.g. bullets). :(

Otoh, I've used 28/0.30 and 44/0.30 thinwall for years without any problems. :thumb

Very detailed
Took me nearly all of Sounds of The 60's (two hours) to write ... ;)

Hth.

Regards,
 
#38 ·
Progressing with this resourceful thread, assuming standard T140 wiring requirements (points, standard headlight beam, standard stator), what changes are needed to go to negative earth?


I understand "black" cabling for to ground points and to - ve terminal on battery.

Will all the electronic components handle the reversed current?


Do I just swap (reverse) component leads.
Will this result in apparent mismatched (reverse) color connections between loom wires and component wires?
 
#39 · (Edited)
For the time/technical poor, how will a handmade loom compare with a quality U.K. made Wiring Loom and modify with blade circuit fuses and upgraded terminations with modern crimping tool?


Example TMS sell (1977 - 78 HARNESS BRAIDED TR7/T140V 1976 TO 1978 L/H GEAR CHANGE & DISC F & R WHEELS) ÂŁ93.90

or Classic Motorcycles sell (Triumph Bonneville T140 TR7 Wiring Harness 1973-78 UK Made) ÂŁ129.60

or Brit Bike Bits sell (Cloth Wiring Harness Loom Triumph TR7 Tiger / T140 Bonneville 1976-78 Disc Rear Brake) ÂŁ106.80

Less VAT for international customers.
 
#40 ·