Triumph Rat Motorcycle Forums banner

T120 Wire Wheel Tubeless Conversion

66K views 169 replies 51 participants last post by  Bobber101  
#1 · (Edited)
G'day all,
My new Avon AM26 front tyre arrived so I took the opportunity to install it tubeless. To me there seems to be no downside to tubeless with ease of repair, less mass and slower deflation in the event of a puncture.

I had already purchased clamp-on tubeless valves out of UK on eBay ,but had I been thinking would have gone for angled stems. Too bad , too late but definitely something for the next swap.
All the research I've done leads to using 3M 4411N Extreme Seal tape to seal up the spoke nipples. So I tracked this stuff down at Blackwoods and paid about 30 bucks for a 35mm wide by 5m roll. This is enough for 3 wheels.

It's also worth noting that some of the cycling types also use plain old-fashioned Gorilla tape for this purpose and they're usually running pressures up about 70 PSI.

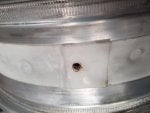
I do know that firms which do this commercially will not do so if the rim does not have a "safety bead" . I looked up what was meant by this and it's actually on the T120 rims and is highlighted with arrows in one of my attached images. Once you look at it it becomes pretty obvious what it's intended to do. And the tyre makes a healthy "pop" as it goes over them on initial inflation.

So I hoisted the bike up on the lift. It will lift without damaging the sump guard if done carefully and stays still enough to work on with a precautionary ratchet strap.
You'll need a 17mm internal hex drive to remove the front axle - I thought the project had stalled there until I remembered my set of sump-plug sockets which I got on special at Super Cheap , and there it was !

Wheel taken off and original Pirelli and tube removed - time to clean and degrease in preparation for taping. I started out with Acetone , carefully , and then went to meths. 3M recommends isopropyl alcohol , so meths is close enough. Don't skimp on this - get in there with a toothbrush if you have to - later in the write up it will become obvious why. :laugh2:

The most difficult part of the process is laying the tape into the trough without it grabbing the sides. You could try and keep it on the roll and bending it up both sides but I simply run out of hands . It's easier to do this in short lengths but that's not a lot of help.
Perhaps the 25mm / 1" stuff would be easier?
I went around the wheel massaging the tape outwards from the centre with my thumbs and had the inevitable bubbles form . This after removing the backing plastic . The tape is quite spongy and ductile and as long as you get a good seal around each nipple the bubbles will not matter a lot but they can be pushed to the edge.

Butt joined the ends at the valve penetration and placed a doubler of tape over them, as per the most popular method. I ran one over the other and used a craft knife to trim both. Wouldn't bother doing it again - Just overlapping seems to work fine and the stuff doesn't have enough mass to affect balance.

So after all this I fitted the new rubber and with these Avons there does not seem to be any particular "opposite or next-to " the valve marking , so I 'd assume fairly neutral balance.
What I should have done at this stage after inflation is the soapy water test! It's not like I didn't have it handy and I was to pay for this lapse of judgement and "press on" mindset.

All back together and spinning the wheel on the forks with the calipers dismounted showed what appears to be a nice neutral balance. This seems to hold true while riding up to 100kph.

But in the morning a flat tyre! Out with the soapy water which showed slow leaks around 2 spokes ;- these marked and tyre removed -again! At least I'm getting pretty good at it .
A casual inspection of the tape revealed a couple of decent bubbles going all the way to the edge as shown in the pics. 3M product good / the installer not quite so!

A new section of tape placed after a further degrease and to do the belt and braces thing , some gaffer tape over the lot , if nothing else just to protect the 3M during tyre fitting.
And a thorough going over with the soapy water at 40 PSI reveals no leaks. You'll notice in the pics that air pressure has largely done what thumbs can not in compressing the tape onto the wheel surface. Its all back on the bike now and I'm liking having new front rubber.

I have been hunting road surface joins and linear gouges and the Avons seem to be a lot better at resisting tracking than the factory Pirellis thus far - something I notice with my T140 which also has AM26's , and the ride is nice.
These are bias-ply just like the Pirelli Sportcomp it replaces but you could easily fit any radial you desire.

Pretty sure some of the people that do this for a living might be having a chuckle but it works! :grin2:


Pic 1 DIY bead breaker - all of about 2 minutes to make and it works perfectly with a block quickly nailed to my bench.

Pic 2 Bubbles highlighted with felt marker after first fitting. Arrows to safety beads. Tape definitely more transparent than before inflation.

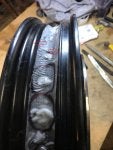
Pic 3 New section of 3M tape placed after removal of leaky section - about 1" overlap at ends,- gaffer tape over all.

Pic 4 Bonnie on lift . Squiggly plastic coated wires from Bunnings supporting calipers . Wooden wedges separating brake pads. iPad sideways photo - don't know why it does that when it's normal orientation on my device? Anyway you get the idea.

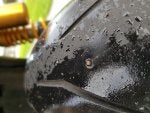
Pic 5 Job done and soaking with soapy water.
 

Attachments

#3 · (Edited)
There's probably a few substances that could be flowed around the nipples and remain pliable and create a primary seal too and I'm thinking now that liquid rubber insulation would probably be even better and easier to apply. Any hobby electronic store has it. So do I !

That noise is the sound of palm on forehead! :|:grin2:
 

Attachments

#4 ·
Nice write up.
Some folks have used a specific type of Locktite (there are about 15-20 different types of this stuff, who knew?) for sealing the spokes to the rim, without any use of tapes or other fussing on the inside of the nipples. I guess having both a tape seal and the Locktite/other liquid-based sealer would not be unwise.
 
  • Like
Reactions: Baster
#5 · (Edited)
I bought the 2mm version of the 3M tape. I think you need to stretch it a lot more when fitting it, as you shouldn't have all those wrinkles. I'm guessing that's where the leak was?
Looks good though!

The 2mm version is 3M 4412N.
 
#6 ·
Yes , I expect that's it, and 100% right on the leak. I was after the thicker stuff but really just took what I could get.. Did you go with the 35mm width?

I found it awkward to do anything much with this stuff apart from place it where it was. Extra thickness would have helped and possibly even just removing the release film section by section to get more tension would work well.

For what it's worth I'll probably do it all over again with the thicker stuff and the angled valve stems when my new back tyre arrives. At the same time I'll try the liquid tape deal too.

Thanks for the feedback and it can only get better!:smile2:
 
#7 ·
I got the 50mm. I wouldn't bother with that liquid tape. I have a bottle of the stuff, and there's no way I'd use it to seal spokes. Just stick with the tape method, but buy a silicon roller like they use for fibreglass rolling, and use it to press the tape properly.

Sent from my SM-G955F using Tapatalk
 
#17 ·
Good info FJ ! I have something similar in the T140, with tubes - a goop that seals and is meant to balance too. There's a bunch of stuff out there and I'm also going to try and run down the Loctite product that may offer a solution. I also have an anaerobic plumbing sealant that's been very effective with fuel systems too.
 
#18 ·
I'd hazard a guess at a combination of cost and potential liability. I get the impression that while this spoked/tubeless thing is being quite widely done , it's not quite yet mainstream.
What is significant is that the T120 rims at least have safety beads , either deliberately or as an aside to the manufacturing process.:smile2:
 
#15 ·
Thinking about it, what would be perfect would be one of those Razor scooter wheels. Silicon tyres, perfect profile for the wheel innards... you'd just have to make an easily-held handle.
 
  • Like
Reactions: Baster
#19 ·
OK chaps - Just a quick update ;- went for a run today out to Quindanning pub to take the GF to lunch . Took the long way around and probably got in about 200km just tooling about.
The Avon AM26 is just fantastic and I believe the bike is much more surefooted than even from new. It's also holding pressure ?.

The front tracks perfectly and is oblivious to creases and road surface joins too. Got the old thing up to some fairly respectable speeds on the back roads and have complete confidence in it.
Will be ordering the rear as soon as money allows.
 
#22 ·
I used a product called E6000 from hobby lobby to seal my spokes. It took several coats and was time consuming, had to brake the tire down a couple of times. After a few days one wheel developed a leak around the threads again so I removed the valve core and applied Locktite 290 to the threads from the hub side of the nipple without removing the wheel. Later on the other wheel developed a slow leak between the nipple and the rim, applied the 290 to that area, after deflating the tire and letting set over night. After riding a few more weeks I went ahead and sealed all of the spokes from the outside with the Locktite. That was months ago and all is well. I will reseal the spokes from the inside with E6000 when new tires are needed.
I said all of this to let others know that the green Loctite will seal from the outside. Also to protect your sealer, tape or whatever you use, tie a string around an old rim strip, so you can pull it out after mounting the tire.
 
#23 ·
Forgot to ask... what valves are you guys using? Any normal one for tubeless rims? No need to modify the hole on the wheel? I need to go back to the big thread on this and read... answer must be there are well...
 
#31 ·
#30 · (Edited)
You shouldn't need to as long as the tyre is replaced in the same position it was removed (that's why they usually mark the tyre-wall in line with the valve when they remove it).
Having said that, there's no guarantee that your wheel was particularly well balanced from the factory, so you could check it anyway :)
 
#32 · (Edited)
There's some excellent discussion here and we are all learning something.

My intentions with the liquid tape are due to it's ability to be flowed around the nipple and through the centre with capillary effect and having some substance but retaining flexibility and then applying the 3M tape over the top. In this it's quite likely to be effective but we will know soon when I do the rear tyre.

I now know there are at least several other sealants that will do including green loctite . My original intention was to use an advanced silicone copolymer sealant , but ease and tidyness of application was foremost in my mind. Subsequent research has shown that silicone alone is often employed for sealing vintage car wheels and there are some easily found articles on the interweb about this.

There are also a welter of tape products sold for this purpose in cycling circles , including one that is orange in colour and comes in widths of up to 43 and 75mm. It would be interesting to see if anyone has used these, but for now I will go with the 3M 4402 ( not 4401 such as I used -works fine , but!?) the gaffer tape may prove to be porous after a while whereas sealing tapes are usually homogeneous.

As for valves , convenience dictates a right-angled stem and aesthetics leans toward the straight ones. There are plenty of clamp-on types available in both configurations and these will go through the existing holes without alteration. I didn't measure but they appear to be about 8.5mm diameter.
These clamp-on valves are routinely used in racing and other demanding applications so their reliability is good according to the research I have conducted.
NOTE :- See next post by Jsobell in regard to valves and their sizing.


I shall also be raiding the local skate park for a wheel in order to better apply tape .��

Original job still holding up just fine but it could have been done better and soon will be.
 
#39 ·
Say, I am using a TPMS (Fobo), and i have spied T-shaped valves that would be perfect. TPMS on top, fill-up valve on the side.
I looked at the Fobo, but the modules are huge (3cm wide, 2cm deep), and I'm not wild on the fact they have to hold the valve permanently open to measure the pressure. It would look really weird with this big ball thing stuck to the valve :)
Still, if you want the T-valve, they sell them on their site: http://www.fobotyre.com.au/tyre-t-valve
You would obviously have to do the tubeless conversion to fit it with the T-adapter, but you can use the sensors as-is if you leave the tubes in.

I'd look at something like this: http://www.ebay.com.au/itm/Car-Wireless-TPMS-Andriod-IOS-Tire-Pressure-Monitor-System-4-Internal-Sensors-/311889838962
Works out to $24 per motorbike :)
 
#36 ·
Three years ago I sealed my wire wheels using Loctite Green 290. I posted about this in the Air cooled twins technical talk, so this is a sort of feedback post.
I used the Loctite only so if you look at the rims without tires on you don't see anything besides bare spoke nipple heads! In all this time the sealing has been reliable and I did pick up a nail once. Pressure loss was slow enough that I was able to get home (about a 60 km ride) to repair it in my garage. Much better than having to do it at the roadside.
There are several ways and sealants available and as long as it keeps the air inside I guess it's okay. I found that the 290 did that and was also really easy to apply.
I think that what's most important is that whatever sealant is used it should be thin enough to be able to seep (wick) into the the threads and mating surfaces of the rim and spokes and remain reasonably flexible when cured.
I'm not convinced that any tape is a long term solution because it doesn't actually seal the leak and only provides a barrier which is unfortunately in a vulnerable area when tire changes are done. On the other hand lots of people are using tape so if it works, that's great!
 
#37 ·
I'm not convinced that any tape is a long term solution because it doesn't actually seal the leak and only provides a barrier which is unfortunately in a vulnerable area when tire changes are done. On the other hand lots of people are using tape so if it works, that's great!
I'm not quite getting what you mean here. In what way does the tape not "seal the leak"? It create a sealed cap that completely covers every nipple and seals to the metal surrounding each one, so it's far more resilient than Loctite and unless you manage to get wrinkles in it there is no way it can leak.
Perhaps you're misunderstanding how the tape works. It's not some sort of dry tape that simply lies over the nipples, it's more like a band of high-stickiness silicon goo that is almost impossible to remove once stuck down.
 
#41 ·
Jsobell, thanks for the pointer. I looked everywhere but there.
Indeed they keep the valve open, but they are an easy and tight fit if you don't disturb them too much. I was not sure either but then they saved my day twice, so I'll agree to the lump on my rim.
Inside TPMS sounds good until you notice you have to take the tyre out to change a battery.
/end of thread hijack.
NN
 
#43 ·
No, the main path of air escaping a tubed wheel is past the valve, and the second most common is the surround of the spoke nipples, not the thread. These are not hermetically sealed nipples, they are a simple domed piece of metal, and it's not 'bedded in' like an engine valve because it's not designed to be anything more than mildly watertight. You can get some nice rims with sealed spokes, but they have a rubber sealing ring on every nipple.
I'm not sure what the 'misconception' is that you refer to regarding air pressure and the tape. In actual fact the tape *will* press into any space that has an exit to atmosphere on the other side in exactly the same way that the plug in your bath is pressed in by the pressure of water in the bath. If the drain in your bath was faulty and filled with water to the same pressure as your bath depth, then there would be no pressure on the plug, but that is not the case in the wheel rims.
You're correct in that the tape *between* the spokes will not be pressed onto the metal of the rim, but this is irrelevant because we're not trying to seal the aluminium rim, only the holes in it.

I'll upload some photos showing the tape that's already present in the wheels, and some shots of the 3M tape applied and working properly.
 
#44 ·
Sourced the loctite green today and found that Blackwoods also has a 16.5 metre roll of the 50mm 4402 tape for around $125. 2 x 2metre rolls cost about $52 so if you went in with a mate the longer roll makes sense.
Already ordered the right-angle valves.

Next week the new Avon Roadrider AM26 for the rear will be ordered and when it arrives I'll re-do the front as well - probably needlessly , but?!

I , for one, now know a whole lot more about this caper than when I first posted. Excellent discussion and thanks for the great ideas!

Bike rolled over 11, 000 km last Monday and I've had it almost exactly one year and I still think it's just the ticket! :)
 
#45 ·
It was raining last night when I came home, the perfect environment for a tradesman's nail (they somehow often manage to leave them on the road) to slide smoothly and easily into the rubber of my rear tyre.
I remember as I arrived home thinking "Hmm, back end's feeling a bit sloppy" just as I parked the bike.

So this morning, when I go to get on the bike, and the thing's impossible to pull out of it's bike-home, and here's the reason:

Image


Well, to be more specific, here's the reason:

Image


So it's time to pull the tyre off, and fit the tape to this wheel.
You can see here the safety rubber strip that Triumph fit over the spoke nipples to protect the tube. You can see here how the band has been pushed into every crevice around the nipples, as the air inside those dimples escapes quite easily.
Now I decided to simply use the tape. The stuff is insanely strong, with an impermeable backing that I was unable to puncture, no matter how hard I pressed it onto the nipples (and I tried, as an experiment).

Image


This is the 3M tape fitted. It's important to pull it tight to avoid wrinkles, and it has a protective non-sticky thin backing that is almost impossible to stretch! Once that's peeled off it will stretch too easily, so I'd suggest leaving it on, have a mate turn the wheel, then remove the protective strip afterwards.

Image


You can also see where I melt the hole using a gas-soldering iron. Not essential, but easier than trying to cut it.

Image


Here's the valve fitted. I used a 90° aluminium fitting with a 7mm thread. Quality is not brilliant, as the threaded piece looks to be about 6.7mm and the nuts 7mm, but I fitted a deep nut to get decent grip.
The best thing to get is a normal rubber-bung valve and drill out the valve hole to take one, but all the 90° I found were fugly, so I'll give this one a try.

Image


The valve has a rubber O-ring under it so it should seal nicely against the outside of the rim. At least it will significantly easier to get an air-hose onto than those damned awful straight valves you get on the tubes.

Image


Then it's slap the back wheel back on, and job done!

Image


Then, instead of going back to my office I spent the rest of the day wiring a tracker into a Ducati Diavel, then rebuilding a 450 trail bike engine. Much more fun than dealing with my usual customers...
So all in all I got no work done, but at least I got around to finally doing the rear, and hopefully my next nail will simply be a slow puncture so I can ride it to the workshop instead of having to load it into the van.

Advice when doing this?

  • Don't obsess over getting the tape overlapped where the valve is. It's probably better to join it between two nipples with an overlap there, as the gap between valve and the two adjacent nipples is very small, making it slightly more tricky to ensure there's no wrinkle where they meet
  • Make sure you clean everything thoroughly with acetone. This tape is insanely sticky, but not to oil
  • The tape is supplied with two backing strips. One is a .5mm very strong non-porous sealing substrate that the 1.5mm of goo is bonded to, and on top of that is a protective non-stretchy plastic sheet to stop the tape sticking to itself on the roll. Don't forget to peel that off, as it's not designed to stay on in place
 

Attachments

#46 ·
@jsobell - so I wonder if the 8.3mm would then fit... if the difference in diameter is similar to what you found on the 7mm... humm... I will order both to test.

I received the tape and Loctite yesterday. All I was waiting for was the information to be able to determine which valves to get.

Thank you for that post. Makes things a heck of lot more clear.
 
#51 ·
I think the 8.3mm is perfect, as that's the same size as the thread on the tubes. When I ordered mine I didn't find an option for that size, otherwise I would have bought them.
Let me know if they fit nicely :)
 
#49 ·
#50 · (Edited)
Woohoo, wakucho, your latest link says AU$5,95 but gives me in dong the equivalent of AU$750 --I'll be careful.

Thanks jsobell for the write-up and the opportunity to see the inside of a Thruxton wheel. Have to say the bead locks seem not as big as on the T120's after all, if I refer to Baster's pics.

I am torn (not good when talking of tyres) between going on with tubes and converting. Good business for my dealer: I supply for both options. Remains to choose the tyres themselves.

NN
 
#52 · (Edited)
Woohoo, wakucho, your latest link says AU$5,95 but gives me in dong the equivalent of AU$750 --I'll be ca
NN
On a similar note ;- I saw some 90 degree valves on eBay for $ 595.00.
These must be the bespoke made , presentation-grade jobs with a walnut and satin box and crafted by the master valve-smiths of Ye Olde England , complete with grey coats, neckties and Cheesecutter hats.:grin2:

Quite a bargain really !