Triumph Rat Motorcycle Forums banner

DIY Street Triple Spark Plug and Air Filter Change

1 reading
109K views 68 replies 32 participants last post by  216str  
#1 · (Edited)
Hey Guys,
I know there are other threads out there that guide you through this maintenance, but I found some of the pictures needing more detail. So I typed up my own DIY guide with pictures (some borrowed from El Paso Joe's write up).

I hope this helps some of you guys out to keep your bike away from the shop!

-Rob

Don’t waste your money paying some tool to molest your bike. Do it yourself!

BEFORE YOU BEGIN
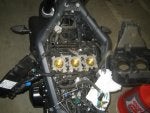
1. Purchase 3 NGK CR9EK spark plugs, 1 new air filter (might as well replace it while you’re there)
2. Make sure your bike is COLD. NEVER change spark plugs on a warm motor.

LETS GET STARTED
1. Get your bike on a rear stand and stable
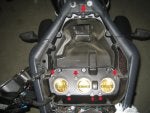
2. Remove your tank and set aside on something soft to avoid scratching the paint (blanket)
a. There is NO need to drain your tank, but it should probably be less than half full to make it easier to lift​
b. Remove the two allen bolts at the front of the tank​
c. You can now prop the tank up using the tank kick-stand that is under the seat​
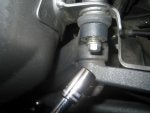
d. There are 3 hoses and 2 electrical connections under the tank. Unhook all of these. The actual fuel line is a bit tricky and has two recessed buttons that need to be pushed in to release the connector.​
e. Remove the single 8mm bolt at the back of the tank AND pull out the metal sleeve with a pair of pliers​
 

Attachments

#2 · (Edited)
3. You should see the top of the air box now. Remove all of the 7mm screws around the periphery.
a. You also need to unhook the electrical connector and tiny hose at the back of the air box. This is the MAF sensor. There is also a larger vacuum hose on the left side of the air box that you’ll need to unhook.
b. You can now let the top half of the air box hang to the left side by its hoses​
c. The bottom half of the air box has a screw at the top and then 6 screws (2 per throttle body) holding it in. Remove these.
d. Now the bottom half of the air box can hang off the right side of the bike​
4. Your throttle bodies are now completely exposed. Make sure your work environment is very clean. I even took a nice clean cotton towel and covered them to make sure I didn’t get any dirt down them while I worked.
 

Attachments

#3 · (Edited)
5. The three spark plugs are located just forward of the throttle bodies, each with their own ignition wire. You’ll want to unhook the electrical connector first. Ignition wires can be pulled by hand or pried up gently using a screw driver or the handle of a ratchet.
6. Once the ignition wires are removed, you’ll need a variety of extensions and an elbow joint to get your spark plug socket into each hole to get the old plugs out. The hardest one was the far left plug.
7. Once your plug is removed, prep your new one with a little motor oil on the threads and gently thread by hand. Then snug with your socket wrench, feeling carefully for the crush washer to collapse. DO NOT OVERTIGHTEN.
8. Push ignition wire back on until you feel and hear a click
9. Reverse the above steps to re-assemble. MAKE SURE YOU METHODICALLY RE-CONNECT ALL HOSES AND ELECTRICAL CONNECTIONS AT EACH STEP!!! Nothing worse than an unnecessary check-engine light after a simply DIY.
 

Attachments

#63 ·
I see that your new plugs have the dual electrode. Did you gap these? and how so? any tips?

On a single electrode plug, the electrode is hangs over the middle part (?). on a dual plug, both are even with the middle part. so my question is where do you measure the gap?

also, on the NGK plugs, do you use any dielectric or anti seize grease?

thank your for the help and being patient with a noob
 
#12 ·
tthis was very helpfull i changed all the spark plugs + air filter+oil but when i went to start it it start fine then idle for 40 sec and died i tried again and worked but i had to rev it a little a bit went for a short ride came back turned the bike off few minutes later i decided to check again still giving me trouble + enging light on what do i do?
 
#15 ·
Could it be like when unplugging the ECU, the system spazzes out till it figures out what going on? (2 or 3 cold starts?)
I know my Subie sometimes got a bit confused when it had a different (cleaner/dirtier) air supply.


On a separate question... is it as simple as pulling the fuel line out of the tank, or do you need to crimp it or something.

Good write up BTW.

Tim
 
#13 ·
Check everything going backwards:

connections under the tank, breather lines correct and not pinched, fuel line not pinched

If you find any problems drop the tank and re-start it, if it's fine your done.

If not pull the tank and re-check all of your other work.

Look for pinched or mis connected vent lines, loose connection, crimped fuel line, sensor not connected, coils tight on plugs, coils connected properly....

If you don't have the means to check what code lit the CEL the only way to find it is to put your hands back on everything you touched .....

.
 
#16 ·
soo i went back checked everything and realized that there was a little hoes underneath the airbox sensor that i never saw . anyways a plugd it put everything else back , started like a king no problems but now the check engine light is on still . also forgot to mentiond that the bike had crm exhausts and were tuned a while ago with the stock air filter and oil filter doubt that. that will make a change to it but just wondering do i have to tune it again . it was tuned at the dealer plz help
 
#24 ·
Tool for removing the lower part of the filter box?

Hi,

Thanks for the great guide. I decided today to follow it and attempt to replace the spark plugs and air filter. As I reached step 3-c, I could not remove the 6 screws of the lower part of the air box. They seem to require a special tool. I searched around already but have not seen any relevant posts. Does anybody know where I can find a suitable tool?

Thanks!
 
#25 ·
Hi,

Thanks for the great guide. I decided today to follow it and attempt to replace the spark plugs and air filter. As I reached step 3-c, I could not remove the 6 screws of the lower part of the air box. They seem to require a special tool. I searched around already but have not seen any relevant posts. Does anybody know where I can find a suitable tool?

Thanks!
I don't recall those screws in particular, but can tell you nothing required a "special" tool. Everything was done with standard screw drivers, socket sets, or allen wrenches.
 
#31 ·
Thanks for the write up. I looked throught the Triumph Service manual for the Spark Plug removal steps and couldn't find them.

One additional thing I ran into was in getting the left spark plug wire boot off. There was a plastic tab on the left side plastic cover that was in the way no matter how I tried to move the plug boot. I ended up having to remove it (one bolt and lots of wire wiggling) to continue.
 
#33 ·
I used the Hayes manual and it shows removing the little infill panel for access to that left most plug. Yes, it was a real bugger to get the socket wrenches down to that plug. I wound up moving that little panel just enough to get the wrench down to the plug to loosen and torque up the plug. I used a rubber hose to remove and install the plug as my wrenches rubber grabber insert was not tight enough to hold those little plugs.

First time doing all this was pretty slow. Getting that gas line off was probably the hardest :)
 
#37 ·
Need help. Changed spark plugs and air filter and now does not start. Back tracked to see if there are any wires and hoses I left disconnected. I put back old spark plugs and still does not start. I tried push starting no luck. What did I forget??? When I push the start button does not do anything, no sound. Could it be the starter, relay??? Thanks.