Triumph Rat Motorcycle Forums banner

'98 Sprint Sport seat recover

2.8K views 12 replies 6 participants last post by  deanzywicki  
#1 ·
I have had my '98 Sprint Sport since new and it has held up great. Last week, I noticed a tear in my seat covering. I did a little bit of research and I saw some threads on recovering motorcycle seats that look promising. I wanted to ask here in case anyone has recovered their seat. What material? Where did you get it from? Any tips/tricks?
 

Attachments

#3 ·
I've been working on a couple of seat projects and I'm very slowly finishing the second one of the year right now, replacing a big chunk of the regular foam with some firmer stuff. Just replacing the cover on these types of seats is fairly easy. You'll want the following:

-UV resistant marine vinyl (IIRC I got enough to do two, maybe four, seats from Amazon for about $10)
-A good, heavy duty, staple gun. Or even a crappy one from Harbor Freight, but I bought a Milwaukee from Home Depot for $20 that I'm pretty happy with.
-Staples
-Spray adhesive
-Heat gun or hair dryer

Maybe a $40 investment, and there should be enough vinyl to do it over at least once if it doesn't come out right the first time.

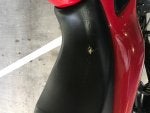
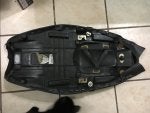
First, remove the staples holding the existing cover to the seat base and detach any straps, etc., noting where and how they're attached. My 955 Sprint seat has a strap that bolts to the bottom of the pan and two bolts for a seat cowl that go through the sides; there were a few different seat types for the T3s.

Cut the vinyl very roughly to shape. DO NOT trim too close; ask me how I know that one! :p You can use the old vinyl as a template, but add at least a half inch all around. (I think a half inch is about all the extra I can get out of a yard of vinyl without using more than half of it.)

Basically, you want the vinyl warm to hot-ish, maybe 110Âş*F or so. While keeping the vinyl warm, spray the seat and the back side of the vinyl with the spray adhesive, then stretch the vinyl over the middle part of the seat where the slope is. Staple one side, stretch it, staple the other, back and forth until you have 2-3 staples in each side. I like to put one or two at the front and back after that, then go back around and staple the living hell out of it. Keeping the vinyl warm really helps for the first few, but isn't really important after.

Once the cover is mostly in place, you should be able to see where it needs to be trimmed and you can do so.

That's about it. Kind of a pain, but not exactly rocket science.

Cheers,
-Kit
 
  • Like
Reactions: jebby
#5 ·
I was trying to share this the other night, but my devices weren't getting along and it turned into a big deal and I forgot to follow up until just now. Anyway, here's a pic of a seat in progress that's nearly finished.

Cheers,
-Kit
 

Attachments

  • Like
Reactions: Paul49
#7 ·
I've had no problems stretching the top part; not a lot of stretching is required. The T3 seats may be slightly more difficult than mine, but they're very similar. Here's the one currently on my bike:

Image


If the embedded image doesn't work, here's a link to it: https://photos.app.goo.gl/X4bhc0LMrfcia17V2

Cheers,
-Kit
 
#9 ·
thanks for all the replies. One of the parts I like about owing older motorcycles and cars is doing some of these things myself. Makes for better stories IMHO. I'll try this as a winter project. I have another project where I need a heat gun (redying some leather seats in my Audi) so I'll get that and some vinyl from amazon and give it a shot. The crinkly spots towards the tank look like they are about ready to tear through also. Not bad for 39k miles and 19 years of use.
 
#10 ·
Not to be a nay sayer, but I bought a cover from Sargent and tried to install it myself. After a couple of very frustrating hours I ended up taking it to the local (good) auto upholstery guy who installed if for around seventy dollars. It looks spectacular. It looks like I bought an entire replacement seat from Sargent.

Sargent still offers the replacement covers. They have a basket weave seating surface similar to Corbin. I went for a contrasting green trim on my black sprint sport. It's stable (and comfortable) but I can move around on it when I want to act the fool.

It's a relatively inexpensive solution with a guaranteed professional result.
 
#11 ·
My 1995 Trophy 900 has a nice Corbin seat. Much more comfortable than the OEM seat. I've not recovered the Triump but I did do one of my BMW Airheads. The work is not difficult but you need to take your time. A hair dryer supplies plenty of heat but use caution if you use one of those Harbor-Freight heat guns as that can melt the vinyl. My BMW used a pre-cut cover from <NW Classic Motorcycle Seat Covers> store on eBay. They also produce covers for the Triumph line.
 
#12 ·
Use caution whatever the heat source. My hair dryer was actually rated at 20% higher output than my heat gun.

Cheers,
-Kit
 
#13 · (Edited)
I finally got around to tackling my seat cover. I got tired of looking at the hole. Bought some fabric from Joann's fabric (upholstery vinyl - it's a little softer than the marine vinyl). It is definitely a fiddly job. Fabric was $24.99 with a coupon. The trick for me was to get it started and stretching along the way. then, once I got to the far side, work my back stretching and restapling. I'll probably go back and restretch in a couple weeks. There are a few wrinkles around the rear grab handle curve on the right side. Definitely not enough to bother me. I keep a tail pack over the back almost all the time anyway. Oner thing that makes this a little tricky is the seat pan is so flexible in the front. You have to have a hand behind the staple gun to make sure it doesn't flex.
One thing I did notice is that I am missing one of the rubber feet on the bottom of the seat. Does anyone know a part #? I looked around bikebandit and saw the seat, but not any of the individual pieces around the seat.
I hope these pics disply ok. I cannot get any images to upload. No matter what format or size, I keep getting error, file failed to upload.

Image

Image

Image

Image

Image