Triumph Rat Motorcycle Forums banner

The Ted Thread

52K views 262 replies 42 participants last post by  speedfoos  
#1 · (Edited)
Right. So I like to keep all my ash and trash in one place because I tend to work on things quite a bit. Better than spreading it all over the forum. This is the Ted Thread and it is dedicated to my new (to me) 2004 Triumph Thruxton, aka Ted Thruxton. That sounds a bit.....childish...the name that is, but it makes me laugh and that is what is important. Especially since he is a gnarly little machine.

So who is Ted and where did he come from?

All good questions. I purchased Ted on a complete whim during the tail end of my divorce (finalized on 23 January, woohoo!) after a 20+ year marriage and while in the midst of my military retirement. I like to do multiple broad, sweeping changes at the same time to keep things interesting. Anywho, I was just browsing Craigslist because that's what I do and I came across Ted. I had a brief lust for a blue 2004 Thruxton about six years ago, but was not allowed to get it because, well, those are some of the reasons I'm divorced now.

Anyway, dude who owned Ted put the Canyon Racing wheels, a 180 wide tire rear kit, the headlight, Bassani slips, and powdercoated the cases, gauge plate, buckets, etc... As far as I know, there have been no other performance mods done but I did notice what looks like a half-arsed Air Injection delete on him. We'll see as I tear into him.

Bike experience. Yeah owned a couple, built a couple, lots of wrench time on cars so this is fun to me.

Here is Ted as he sits now. This is a repost from my intro thread.
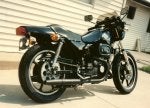
Fresh on the truck

Image


Fresh off the truck

Image


At home with his mates, my '76 Ironhead sporty project/opus/boat anchor and my girlfriend's '06 Sport Classic. His other mate, girlfriend's Ducati Scrambler isn't allowed in the house. When you're newly divorced, motorcycles are more fun than furniture.

Image
 
#41 ·
Well, it was mainly a preponderance of information on this forum. Most folks seem to replace only two to achieve the right amount of additional holding power for the air box, exhaust, re-jet dance that's most common before getting into the greasy bits. If Ted's clutch doesn't hold now, I can always add the second two springs and see before going to a different clutch.
 
#43 ·
Not much to tell really. It's the stock bucket that has been powder coated a satin black, and your standard $150 LED headlight installed.

Ordered everything to rebuild my forks to include new progressive springs and Racetech emulators. This will be a nice new upgrade.
 
#44 ·
While I'm in there I may as well replace the neck bearings, relocate the ignition and a put a new set of headlight ears on him (thanks DimeCity!). All in the big brown truck ether right now. Exhaust stuff should all be here tomorrow to redo the baffles as well. Once this is all done, I'll feel good about riding him to New Orleans next month.
 
#45 ·
Moving right along on getting Ted up to snuff. He's kind of like a recessive British rugby player. All red headed, freckled up, burly but some niggling little issues like, "I got uh sniffle", because his catch can was leaking a little yesterday. Always something with him right now but just about sorted.

Re-wrapped with new exhaust wrap (reusing old wrap on my bafflectomy) and a new set of titty grips to match.

Image


Image


The suspension rebuild parts are starting to show up, new neck bearings are here, all of my bafflectomy materials are here so it's time to start rolling SS mesh and making the new baffles. 8.5mm Magnecor wires are on the way and that should pretty much do it for this year. We've got a little ride sked from here to New Orleans in a couple weeks so that should be a fun shakedown ride for everything. I think I've only put about 600 miles on him so far.
 
#48 ·
Neat, check your PMs.

Let's see. Breather still an issue. Rerouted again, longer hose, should spit out the back of the swingarm away from the tire because I no longer care. Poor design on the crankcase breather now that I think of it. Not sure why it doesn't run up into the valve cover and then have a standard PCV/breather exit port on the other side. Regardless, rering and rebore will happen a lot later this year.

Ignition bracket relocated, changed out idiot lights to LEDs with the exception on the turn signal because I'm having a hard time finding a 74 base LED that isn't polarity sensitive to pop in there. Turns out someone had done a clock LED swap from NewBonneville in blue. I liked white better, so I will move the four 194 blue LEDs and one 74 wedge bulb (also in blue) to anyone that wants them for $10 shipped. Hit me up if you want them.

All suspension parts are in now. Still procrastinating on the bafflectomy, blah blah.

GF sold the Sport Classic a couple days ago and it was a very sad day. So sad her Scrambler had to come over to keep Ted and the Sporty company.

Image
 
#51 ·
Bafflectomy complete!

Not really any change to the sound or the volume/db rating however it is now a true free-flowing set of cans.

Tacking along to set up the new baffle.

Image


A little side-by-side comparison. Ladies don't let your baffles be louver core. Bassani cans for your information.

Image


Tip adapter.

Image


And all wrapped up with fiberglass mat and ready for re-insertion.

Image
 
#53 ·
Right. Been a little busy. Cliff notes:

Trip to New Orleans. 1250-mile roundtrip on a cafe racer is a little ambitious when you're in your 40s and beat up.

Ted spit oil out his breather the entire way. My girlfriend thought there was a lot of bugs until I fessed up. She led most of the way after that. Turns out I mangled the breather tube seal inside the primary when I was mucking about which caused it to spew about 1/2 quart of oil every 500 miles out the breather tube. What a poor design. So it's designed to relieve crankcase pressure - aka a PCV (positive crankcase ventilation) system. But it's direct from crankcase to atmo without anyway to return the oil back to the crankcase. More on my redesign in a little bit.

Here we are about to head to NOLA.

Image


Turns out I secured the lefty righty but not the backy forthy so Ted's rear tire got a little snack. But it was a good trip. A little gas station action.

Image


Image


Last stop for PoBoy's on the way out of NOLA.

Image


A quick plug wire swap back to stock (from new Magnacor 8.5mm) while troubleshooting my ignition issue. Did not help.

Image


He died in the HOV lane during a rainstorm in Houston on the way home. Was my girlfriend's first time riding in the rain. Imagine her chagrin. A quick rest and he was fine for the rest of the trip. Weird. Voltage regulator was up front under the headlight and was not hot, but it may be the culprit. I will see after he's back together.
 
#54 · (Edited)
Some post ride clean up and header steam.

Image


And teardown. Fork springs, emulators, tapered cone bearings in the steering neck, wiring sort, headlight ear replacement from Dime City, breather seal replacement, voltage regulator relocate (because headlight ears lower the headlight and cause it to hit the regulator, repacked the baffles and added a little turbulence creator to lower the dBs because he's really loud, tucked the wiring to run without side panels, plus a general cleanup.

Torn the eff down.

Image


Races installed after removing the old ones.

Image


Masking

Image


and plasti-dip coating the forks. I will blast and cerakote them this winter, I'm just impatient right now.

Image


Slowly getting him back together.

Image


New VR location.

Image


So the new PCV setup. Top of the VC will take the feed directly from the crankcase. Oily vapor will travel to the top of the head by the cam chain. Pressure will be relieved via the fitting on the right corner, which is away from slinging stuff so any leakage will be minimal and taken care of via a catchcan or high routing. Enough of Triumph's poor design. If this proves to be a poor design as well, I can swap back to my old valve cover.

Image


And as he sits now. Need to get a pipe cutter to make new fork spacers and do the breather seal inside the primary. That will likely be tomorrow. Obviously the astute viewer will notice the old silver VC in that photo. Suspend your disbelief and pretend this is a Quentin Tarantino film.

Image
 
#57 ·
Right, seat's done and so is the suspension. I did not replace the bushings or seals like I originally planned. I'm going to blast and cerakote the lowers this winter so no sense in replacing everything twice.

Here's the seat. No inprogress pics because it was messy. I peeled back the top and created the cavity for the gel piece and memory foam and stuck it back together.

The whole process took about an hour with a flap wheel on my die grinder, a bread knife and a couple razor blades.

Image


Image


I bought the small pro pad kit from Kno Place.

https://knoplace.com/

Finished cutting spacers at +20mm preload and filled to 120mm with 10W per Racetech's instruction. They recommended 15W, but I will see how this goes. Pretty simple stuff. Just need to replace the oil seal next!

Image
 
#58 · (Edited)
All back together and the ignition/start button doesn't work. Fun. Functions from button to harness junction in headlight and solenoid tested good. Must have ham-fisted something when I cleaned up the main loom. Time to break out the razor blade and peel back to look and see what I did. Bike starts just fine when I jump the solenoid contacts.

Always an adventure.
 
#60 ·
A key thing to remember. Mechanicking is just working with big Legos.

Once you view it like that, it makes things a lot simpler. Everything is a system that works together, so it helps me to break things down into their subsystems to understand how they all work and - importantly - work together.
 
#63 ·
Fixed. What a pain. Turns out I snipped a ground wire that I should not have. All's well that ends well, but this job sucked.
On a 1976 750-A that had had a wiring harness fire. One at a time, end to end, tape, undo, tape, test, and the damn thing ran! For 1000's of miles whilst I had it... Love the wiring, at least that makes sense, not like that fuel injection voodoo...

Thanks for keeping the story going!
 
#65 ·
Continuing to chase down gremlins and my blowby problem is still not fixed. I was afraid of the ultimate cause of the excess blowby but the fix will incorporate an upgrade. Seal replaced, blow-by hose rerouted, etc, still get a decent amount of blow-by. This means rings to me although I have not run a compression test. That's OK. Once TTP's kit is fully for sale, that's the next step. Freshen up the bores with a high comp 904 kit and be done with it. Catch can goes back on in the meantime.

Next up, need to dial in the suspension from the upgrade as I am pogoing a little and have some high speed (85+) instability. That is exactly when you do not want instability. Should be just a little play with the preload adjusters.

Running issues that continue from the NOLA trip.

So Ted has acted like he is fuel starved on a couple occasions. To the point where he has shut off on the road even with over 3/4 of a tank. I originally suspected a wiring/ground issue but have since gone over ever inch of the harness and connectors with a multimeter and my M1-Eyeball. New things added as required (plugs, wires, ignitor, not coil but it tests good). I am moving on to fueling because when I started him yesterday morning, he started running like his occasional poop and I looked down to see the petcock was off because I forgot to turn it to "wee!".

Hmm..there's a thought. Fueling.

I already rebuilt and rejetted the carbs so that should not be problem. Fuel line is unkinked and leak free, fresh gas....one more culprit.

The petcock.

Has moving parts. Moves fuel from point A to point B, is almost 15 years old. Appears to be a Mikuni unicorn in that no one stocks a shelf rebuild kit for it. I can buy another old, used Mikuni unicorn petcock that range from $45 (Speedmaster) to $90 (Thruxton) that are all the same model. That Thruxton upsell.

Right. Pingel 6111 and 1601C adapter block ordered for $111. We'll see if that takes care of things on that front.
 
#66 ·
It wouldn't be a blocked vent in the fuel cap ?

This happened to me many years ago on my old 1973 T100P.

I was over enthusiastic with the Solvol Autosol polish and blocked the vent when the polish hardened.

Sent from my SM-G900F using Tapatalk
 
#69 ·
Right. Well, I decided to get Hambone up on the jack to sort his wiring out and a bunch of parts fell off. What's kind of funny is the last time I documented any work on this bike, I was still married. Life is funny that way.

Regardless.

Hambone's butt pulled off.

Image


Image


And let's take him outside and dress him for success.

Image


Time to whip out the sawzall and die grinder cuz it's bobber time!!

Image


Image


Right, so what I'm actually doing is prepping Hambone for the Danny Bird "bolt-on" hardtail tail that I bought two years ago.

Two years. Wow. Anyro.

All this cutting and grinding isn't quite what I had in mind for a bolt-on hardtail, but that cookie crumbles that way sometimes. From what I remember, the hardtail section I bought is a 2 inch out and a 1 inch down over the stock stance so it should be neat when it's done. A funny thing is that the motor is a '76 but the frame is a '64. So much for matching numbers. Makes me feel better about cutting it apart.

My house is a mess, I'm headed out for work for a couple weeks tomorrow morning so yay. Oh. Catch can is working well. I've been riding the piss out of Ted today. Rear end getting loose on corners and at the top of second, it's been a blast. I'm sure the catch can is full, but the good news is that it is manageable.

Messy house.

Image