Triumph Rat Motorcycle Forums banner

Please post a step by step to lube the rear wheel bearings.

112K views 133 replies 48 participants last post by  DarthEsox  
#1 ·
Hi all,

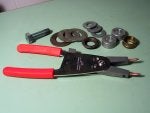
Based on the conversation in another thread and my inability to find what I am requesting, I wonder if someone would post a basic step by step to lube the rear wheel bearings. Since the break down of this bearing seems very dangerous I am guessing that many would be happy to have the info.

Pics are not necessary but the correct sequance, maybe any special tools and/or their substitutes, and the correct lube type would be very valuable.

Thanks a bunch all!

M
 
#36 · (Edited)
OnD,

Forgive me for picking nits...

The BB exploded drawing shows three seals. All are part number 8. One is shown outboard of the cush drive bearing, and then one on either side of the Needle Roller Bearing.

http://www.bikebandit.com/triumph-motorcycle-sprint-st-2003-rear-wheel-final-drive/o/m17626sch567549

Your writeup describes replacing two. Did you replace two or three, or is the drawing inaccurate?


Charlie,

The cush drive is a radial shock absorber. There are two sets of 'fingers,' on on the drive side, one on the wheel side. They interlock, but with a thick rubber 'cushion' between them. Look at part numbers 11 and 14 in the link above.

The 'cush' is there to soak up the high frequency shocks in the driveline.
 
#39 ·
Ok Pushr0d, I see it, thanks. And folks sometimes shim worn rubbers with innertube material, huh?

I'm feeling much better now. :D

Thanks,

---Charlie
 
#40 ·
Thanks OnD, I think I get it now. Pushr0d's link was for a 2003 sprint, and yours is for a 2005 or later.

---Charlie
 
#41 · (Edited)
OnD,

I think we all owe you a round at the next bar stop!

I know I do! Thanks-a-million.


For the rest of you guys...:angrysoapbox:

Three cheers for OnD! It takes a lot of quality time to write-up a service procedure such as this. Especially on a message board. Double hard. It's very difficult and frustrating to edit and improve the original post once it's digested. Also, you don't have the luxury of an editor's assistant to preview your work.

:smackglass:

Once you "lay-it-out" publicly, instead of receiving praise, you take the chance of receiving criticism and some innocent smarta$$ remarks. You may be dealing with members that have limited mechanical experience, and they sometimes "jump in" and confuse the issue and lure folks away form the original expert's instructions.

OnD can help us all save our hard earned money by offering us technical assistance so we can do it ourselves. Being able to tackle routine servicing is a crucial part of being a real Triumph owner operator. They tell me that it is a very satisfying accomplishment to become a complete motorcycle enthusiast.
:3dcool:


We are fortunate to have someone with the skills of OnD to share their experience with us.
:thumbsup:
 
#43 ·
Thank you, and now I am thoroughly embarrassed. :eek:

There are plenty of other people here that regularly support all of us with info and advice. Warden, you have also been known to do it.

But be careful with any praise. I would not want you to incur the wrath of those I might have poked along the way. Although I rarely do that. ;)
 
#46 ·
Staked Nut

What I did with mine after reforming it and cleaning up the axle threads a bit was after re-installing it, drilled through the nut and the grooved part of the axle where it was staked and installed a cotter pin.

I could see that after 3 or more removals of this nut, you could be faced with replacing the axle too. My axle and nut required about 45 minutes of work to clean it up enough for smooth operation. I have repacked my bearings twice and see no need of ever replacing the modified staked nut. Easy on, easy off.

my 2 cents, KB
 
#48 ·
I just performed my 24K service last weekend. OnD's procedure is spot-on!

However, he only briefly mentioned a significant point:

The circlip ('snap-ring') that holds the brake mount to the end of the eccentric is a BEAST. My pliers were not up to the task, and I had only one friend with a pair that were not quite big enough, but they worked.

The circlip requires a spread (between holes) of at least an inch.

So, before you tear the rear end apart, make sure you have the pliers 'el grande' available.

Also, the inner circlip that retains the needle bearing requires pliers with a fairly lengthy reach in a small opening.

I planned on replacing the seals, since I assumed they had not been at the 12K. They looked fine, but I replaced them anyway. The 55X45X4mm seals (3 each) are very flexible. They can be installed with your fingertips, and then seated with the same tool you use to seat the bearing. I had to buy mine from the Dealer and have him mail them to me.

Lastly, the cush drive may act like it has a bolt holding it together. It doesn't, that is, once it is off the axle. It will probably stick together, and will take some effort to break the housing and the driven side apart. Just be careful, since everything is aluminum, and therefore quite brittle.

You might have luck putting it on the axle, which is held either in a vise (soft jaws, please!) or already reinstalled on the bike and held by the brake, and then twisting the drive forwards and backwards to break the 'stiction.'

Thanks again, OnD, for a very nice write-up of the procedure. Which, by the way, is not in the Triumph Manual.
 
#50 ·
Interesting. A question for those that have done this proceedure - was the bearing worn or in desparate need of grease? I only ask because I know that its not going to be done in regular servicing and as I'm an 'impatient' person (read bum mechanic) I would most likely have to get a 'patient' person to do it for me:rolleyes: Therefore risk assessment required.
 
#51 ·
Ibafran,

This procedure is WAY more involved than just removal of the wheel.

The wheel removal is fairly straightforward. Remove the safety pin, apply the brake with one foot, try not to get a hernia while breaking the axle nut loose.

Two notes: When you remove the pin, note which way it is oriented. It should go back on the same way. When you have put it back together, put a small (UV stabilized (black)) ziptie around the two ends of the pin to prevent it from coming off the nut. It is a standard procedure at my Dealer's shop. Apparently for a reason.


MickSprint06 - My needle bearing looked fine. The grease was 'well-used,' but looked like it would have been fine for several more miles.

However, it is a 12,000 mile service that should be considered 'Critical', in view of the fact that several owners have reported failures of that bearing.

Failure of the bearing will almost certainly ruin the eccentric adjuster, which has got to cost a ridiculous amount of money.

If the failure occurs at speed, it could kill you.

Is that enough of a risk for you?
 
#53 ·
A quick question about this procedure. I hate it when I get stuck on something like step 3. Hahah. I got the bearing wheel nut off absolutely no problem. It was almost a bit TOO easy to get off, actually, as I didn't even use the rear brake to hold the bike, just the engine's resistance.

But the hub-side nut... DAMN! I cannot get that thing off for the life of me. Did anybody else about give themselves a hernia? Well, my bar was pretty short (about 16") since my socket is a 3/4" drive and my true breaker bar is only a 1/2" drive. I might stop at the hardware store and buy a piece of pipe but I checked and the torque spec is only something like 145 Nm so it shouldn't be that hard to get it off...?

For those who want to ask the simple question: yes, I un-staked the nut ("de-staked", "un-staked"?). A related issue is that my socket's wall thickness it too much such that it doesn't fit into the hole in the hub but rather just grabs onto the exposed ~3mm of the nut, so it's also prone to pop off, making the job more of a pain in the butt than should be. Was everybody else using some sort of thin-walled 46mm socket?

I'm still surprised that it is being so difficult... It's always the stupid little things...

Last question: the Belleville washer on the wheel side was previously installed such that it was concave as viewed from the right side. Is this correct or did the last shop that did my tires put it on backwards? From the manual it seems that it should be installed convex.

Thanks guys!
 
#54 ·
Convex side out re the Belleville.

A std thickness socket should do the trick. Maybe yours is an impact socket? they are of a stronger material and sometimes a bit thicker.

I just use a $12.00 46 mm socket from Northern Tool. I cut mine down in length just in case I want to pack it with me on xcountries.


#55 ·
Thanks for the advice re: convex. I thought so. The shop must have messed that up last time I got tires.

It's not an impact socket but it's a pretty stonkin' one. It definitely doesn't fit in the recessed area in the hub. The socket is Harbor Freight (I don't use these things often enough to merit buying a nice one) -
http://www.harborfreight.com/cpi/ctaf/displayitem.taf?Itemnumber=5494

I'll see what Sears has available.
 
#57 · (Edited)
http://www.richard-halford.co.uk/chain.html

Here is a good tutorial for servicing the rear hub, that might help. I had mine stripped down and the new bearings in in about 5 hours. I wasn't rushing. The tool I didn't have and needed was a 4" circlip plier. That makes removing the big FO clip much easier. Also, put the new bearings in the freezer over night, and heat the hub when you install, and the bearings drop right in.
 
#60 ·
Hello,
I recently bought a 2006 Sprint with just under 10k miles and am doing the rear wheel bearing before the riding season starts!
I have found this thread very valuable, however, I am having difficulty with the bearing retainer ring on the right side of the hub.

I bought some circlip pliers but I can't get that ring off and I don't understand how to remove it. The ring has a gap in it with two parallel edges--i put my plier pins in the gap, one edge wants to push the plier pin towards the seal wall, the other edge wants to push the plier pin towards the center of the hub. So when I try to expand the pliers in the gap, it slips and i have marred the seal wall a bit.
The new retainer ring sent from BikeBandit has two holes which makes sense.
Does anyone have any tips for me? Am I using the wrong tool?
Thanks guys, I appreciate it,
-Jon
 
#62 ·
Thanks for the reply Katana,

No, i got the big one off without too much trouble--i'm talking about the "bearing retention ring" on the right side of the hub. It's mentioned in step 2 of the bearing remove in oldndumb's procedure from the second page of this thread.
I have a pair of pliers similiar to the ones in your picture, will those work for the "bearing retention ring?" I'm having difficulty with that one.

Thanks again,