Triumph Rat Motorcycle Forums banner

Guide to replacing Head Gaskets

32K views 17 replies 9 participants last post by  2wheeladdict  
#1 · (Edited)
In preparation for my superchager I need to install thicker head gaskets . This is a Nearly step by step guide to getting the head off with the engine still in the frame.
I tries to take as many pictures as possible , what I missed I will try to describe as best I can.

It begins with draining the coolant and removing the radiator and oil cooler then exhaust header

I used foam ear plugs to block the oil lines .
Once the header is off you can drain the block , there is a 10mm bolt on the left side .

This is an excellent Guide to cam clearance checking and cam removal
And yes to take the head out you must remove the cams. There are some great tips in that thread . That gets you to the next step.
Remove the throttle bodies and fuel rail.

You should also remove the fuel injector support rail and throttle body boots . I did not but it will make things easier down the road, hindsight is 20/20
There are 2 connectors that have to be undone and the tie straps cut so that the head will come out unencumbered. There is also the oil feed line to the head that needs to be removed , it is sealed with copper gaskets. Top right hand side .


Continued...
 

Attachments

#2 · (Edited)
Now it is time to release the head to frame mounting bolts .
This is important ..... If you bike has shims , they will be on the right side of the bike.
Mine only had one shim on the rear right position


8 head bolts must be released in sequence .

No pictures of the next part .
Remove the rear cam chain tensioner , the short one . There is a washer behind it , watch for it . It will slide down and out of the case .
Now remove the bolt on the forward cam guide . It has a washer too . Leave it where it is for now and give the head a smack or two with a rubber mallet . It should not take too much effort .
The head has 2 dowels , both in the front side .
This is the tricky part . The remaining guide is held into the head with a couple of nubs in a groove. You need to get the guide over to the rear side of the head to get the head out . Like this

The nubs

The groove


The trick is to lift the head and grab the guide , push the guide up ( the gasket is holding it down ) once clear of the block slide the guide to the rear as in the pic above.
The guides are pretty robust , some sort of cast aluminium with a coating . No need to worry about breaking it , unless you are being stupid.

Once the guide is back you have to lift the rear of the head and rotate it forward. The right front frame will block lifting the head too much, so get it as high as you can and flip it forward. You will clear the cam guide and then be able to pull the head out to the left side .

Success !


Continued ....
 

Attachments

#3 · (Edited)
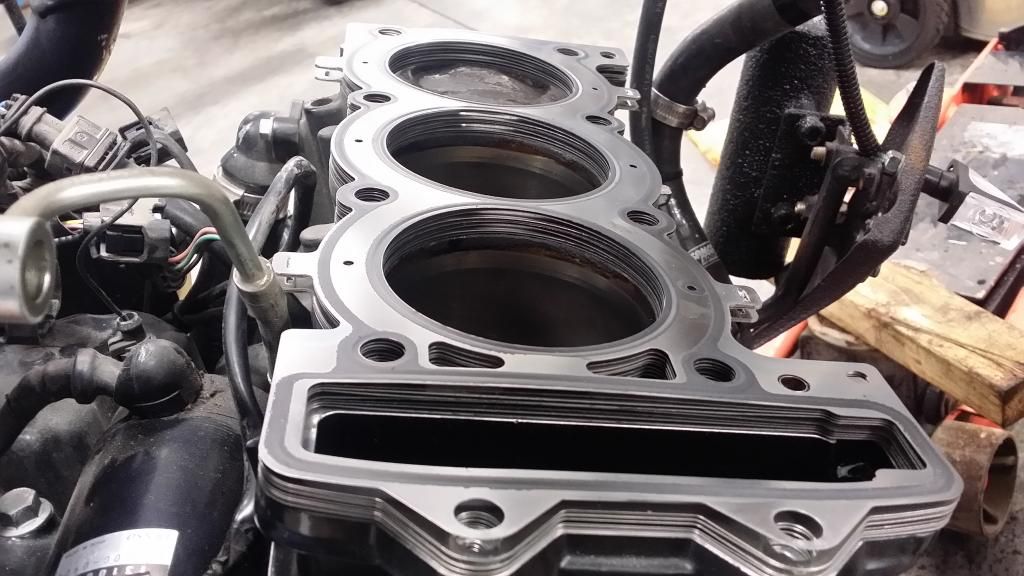
Clean the surfaces and install the new gaskets

Cross hatch still good , though more carbon than I expected to see .

I used a shop vac and compressed air to clean out any loose debris in the combustion chamber .
While the head is out clean the cam chain tensioner gasket surface and the RTV goop from the cam cover gasket

Put the head back in the same way you got it out . A partner is helpful here to save scuffing the new gaskets. Once you are in and down over the dowels you can fight the cam guide back into place . I found this to be the hardest part . Getting both nubs into the right spot while holding the head up and sneaking the little bastard under the gasket .


I removed the shims and buckets using a magnet as described in the thread in the first post . While they were out I measured the shims and noted the thickness in a chart in my WSM . Now in the future , if they ever do need adjusting I know what size is in there . Some quick math and I will know exactly what size of shim to buy to put it into spec again :)

Since my TDC needle is ground off ( story in another thread ) I had to use a dial indicator through the spark plug hole to find TDC . Once I had that established I set the cams

EDIT FEB 25 2018 : You will see that the arrows are not as exactly lined up as they were before . due to the thicker gasket this is normal . I suffered a cam tensioner blade failure 9( the short one) on a ride in 2017. While replacing the part we had to retime the engine again. This is positively correct . also , remember to use the arrows not the triangles when timing the engine .

Then rotated the engine through a dozen revolutions.
Once happy with that I put the cam cover on and started on the reason for the thicker head gasket .
:D
 

Attachments

#7 ·
No it does not. I change oil every 4-5000 kms with my choice of synthetic. I check the oil every week at the least. If I have had it drop two sections of the cross hatch marked area on the dipstick between changes that is what I consider average.
The cross hatch is critical to proper cylinder lubrication. If anything I would say the crosshatch is too shallow. Should be about 45°. If the crosshatch is too extremely shallow (horizontal) it will hang on to too much oil and the rings will hydroplane over the cylinder wall. Never really breaking in or scraping excess oil off, leading to lots of burnt oil. My shallow crosshatch may be the reason for the carbon

Too steep and no oil is retained and the cylinder wears out quickly and self destructs.
I have been into motors with 300,000kms and there is still a visible crosshatch. That was a 1955 police car :) It is essential to long life of a motor.
If you get into your motor and there is not a visible crosshatch, you need to get the block honed and new rings installed.

Sent from Motorcycle.com App
 
#10 ·
No problem Phil . Glad I could help .

Martin , yes that stack is pretty wild . There is no other choice , really . No one makes a thicker one piece head gasket . No market one would presume .
I am just trusting Richard and the dozens of kits sold and installed using this method.

One thing I did not mention before is that I used new bolts in the head , I did not reuse the old bolts .
I also spent a fair amount of time examining the old head gasket , it looked great , no signs of leakage or failure .
 
#11 ·
Just wanted to give a thanks to DieselGeek both for his write up and pics and a few helpful hints via pms. Also thanks to Champ87 for an amazing write up on valve adjustment.

I just finished a headgasket change on my 08 Sprint, Everything I read indicated this is an out of frame project only. I really don't understand why? The last thing I did on removal was release the headbolts and within 10 minutes of that the head was off. Didn't touch anything on the way out, lift it forward, remove the fiddly cam chain guide, lift up the head and twist outta the frame.

The only precautionary thing I did over what DieselGeek mentioned was place a piece of paper over the block during install, just to make me feel better about the potential of a piece of dirt or something from around the front of the bike dropping in while I manipulated the head back in place. Once it was close I slid the paper out and lined everything up.

Took my time, kept everything covered and clean as possible during the job. took pics of the things I figured I'd likely forget later and used the Haynes manual frequently.

Once it was all closed up I prayed to the gods of all motorcycles that I hadn't left a bolt, screw or wrench inside and hit the starter button, Fired right up, runs great, no leaks, and all done for the cost of a gasket kit (I bought the head kit as it has all the gaskets that you'll need as opposed to ordering them all seperately.) new plugs and air filter.

Thanks again guys! That was the farthest I've been into my bike thus far and I'm guessing that I saved a pile of coin on labour, as I'm guessing the local dealer would have insisted on following protocol and charging for a full engine out of frame job.
 
#13 ·
In frame ...... S-3 Head Gasket replacement.


Reply from a Bumpee ............
I just came across this excellent thread & I have to say that without you going to the trouble to post it.......well, I for one, would have been pulling my motor out to do this job & wasting un-needed bulk extra effort. Thankyou Diesel Geek for this well laid down imformative post. De-Cosse & you certainly put the yards in !!!
Cheers Lee. :)
 
#15 · (Edited)
I appreciate the detail, and the photos. Thank you @DieselGeek for putting it together and dealing with the Photobucket BS to keep the photos working.

I could use a little help because I'm struggling to get the head off my buddie's '01 955i motor while it's still in the frame. I am SO CLOSE, and it's probably me at this point. There's some differences because your photos are with the 2nd generation 955i motor and it's different engine covers.

To be clear, it seems that in order to get the head off I need to get the forward cam chain tensioner out. Actually, it seems both, plus the timing pickup, the toothed wheel, and the cam chain. On the previous generation motor, if I remove that toothed wheel to get the cam chain out, is it keyed so I won't disturb the timing? This is killing me to have the rear (intake) side of the head easily come up but the area at the front (exhaust) barely lifts and certainly not enough to clear the locating pins on the right (cam chain) side.

Am I on the right track with removing the remaining bits I mentioned? Is that previous version 955i the same as yours?

Thank you!

Ken M.

EDIT: I did remove the toothed timing wheel from the right end of the crank, the timing chain, and the rear-side tensioner guide. I still can't seem to get that other cam chain guide out, though it's a lot looser than it was. I can't get the head off, and now my back is shot from leaning in and trying. Ibuprophen therapy, and I'll get back at until it's off.
 
#16 · (Edited)
This thread has helped immensely as I am in the process of doing the head gasket on my 01 Tiger 955i but I have some questions:

1. The gasket I pulled out appears to be an organic-steel-organic gasket with some green sealant lines but the part I received from triumph is a 3 layer MLSgasket with black sealant lines...will this cause any issues?

2. Does anyone know the correct torque sequence for the 955i? My service manual conveniently has the cylinder head removal/ refitting pages missing. I found a copy of the Tiger 1050 torque sequence online but that’s probably not correct... I found torque seguence from a copied page of the the Daytona 955i manual online to be 20nm-27nm-90deg. Would this be the same for the Tiger head?

edit: 3: is pulling and sealing the liners an absolute necessity?
 
#17 ·
1. If you ordered the correct gasket part number and that's what you got then I imagine it would be fine, perhaps Triumph have replaced the older style gasket.

2. I don't have a copy of the Tiger manual, and 955 Tigers have a 2nd gen 955 block with a 1st gen 955 head so they're an odd one. I checked the first and second gen 955 manuals and they're both 20Nm, 27Nm then 90°, so you're probably fine to use that. I'd ask on the Tiger section of the forum to be on the safe side as somebody over there will be able to tell you.

3. If you have turned the crankshaft while the head is off then it's a good precaution. With the head off, all that's holding the liners down in the block is gravity and the sealant, so that seal is easily disturbed if you turn the crankshaft. You don't want to put the engine back together then find you're leaking coolant into the crankcase. It's not that difficult to do, you just need to be very careful getting the liners back over the piston rings without catching one, particularly the oil rings. I've caught the rings myself, see here for details.
 
#18 ·
Thanks for the help RampantParanoia! I had a look at my spare motor and that one had an MLS gasket so I’m not sure why there was a fiber gasket in my bike in the first place...

I used the 20-27-90deg and it seems like it worked, according to my digital torquewrench the final torque value after the 90deg was around 40ftlbs.

I decided to seal the liners, for anyone else a bit trepidation about doing it, it’s not that bad! I used KitNYC’s thread on how to make a puller from a sewer plug and sealed them with Permatex 85420 a hylomar replacement.