

UPDATE: Genuine Dealz now provides a custom cable service - http://www.genuinedealz.com/custom-cables/custom-battery-cable-assembly
Makes it really simple to get them pre-made to your specs!
This came about as result of discussion with OldnDumb, when I came across an E-Bay vendor selling Starter Cable kits for various bikes, Triumphs included.
The premise actually seemed sound - the price a bit steep for what it is - $75.
So OnD & I both elected to undertake this, he on the 1050 Sprint; mine on the 955i Daytona.
OnD actually was a little less tardy than me in ordering materials & actually completed his a couple of days ago.
The mod involves upgrading the cables for:
Battery Positive - Starter Solenoid;
Solenoid to Starter;
Battery Negative to Engine Ground.
The whole purpose is to reduce voltage drop to the starter, providing maximum energy from battery to starter motor.
I failed to take a comparative pic for my own cable set, but is essentially the same size-wise - 4 GA is 4 GA!
The project materials are 4 GA UltraPure Copper Wire and Tin-Plated Copper Lugs.
I bought some Cable sold by foot from an Auto Audio supplier on EBay (there are quite a few - shop around) - bought 8' and had a couple left over
If you were frugal, you can see 6 would be plenty.
The Lugs and Pellets I got from GenuineDealZ - with name like that, has to be good right?
Note that they also have an assembly service so if you buy the cable, lugs and heat-shrink from them, it will cost you additional $6 to have them pre-assembled.
I probably overdid it on the lugs - got the heavy wall items when in retrospect the std would have probably been plenty adequate.
Size of course is 4 ga 1/4".
We used different techniques for the cable assembly, more driven by what was at our respective disposal, as opposed to a technical preference.
OnD used a creative self-fabricated crimp tool (hopefully he will follow with pics as an addendum); I wanted to try another inexpensive method.
My lugs were soldered onto the terminals by use of Solder Pellets.
The lugs and wire were lightly coated in flux and then the lug was heated with Propane torch until the solder pellet melted; at this point the stripped cable end is inserted into the lug and when source heat is removed, it cools rapidly and the cable is securely fastened to the terminal.
This is the type of system I used (not same brand, but similar principle):
Alternatively, the lugs may be crimped onto the cable.
There are inexpensive 'hammer' (or vice) type crimpers available for ~ $20.
Or try your local Auto-Stereo Install Shop - you may be able to source some inexpensive off-cuts of 4 GA wire, as well as having them crimp the lugs for you.
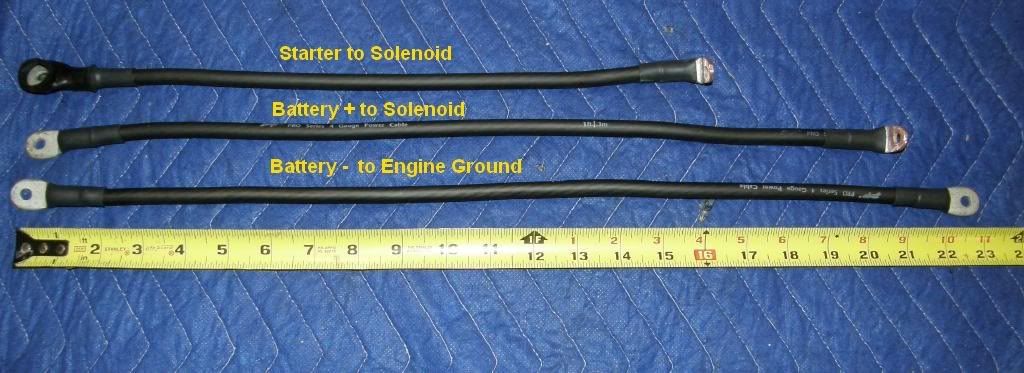
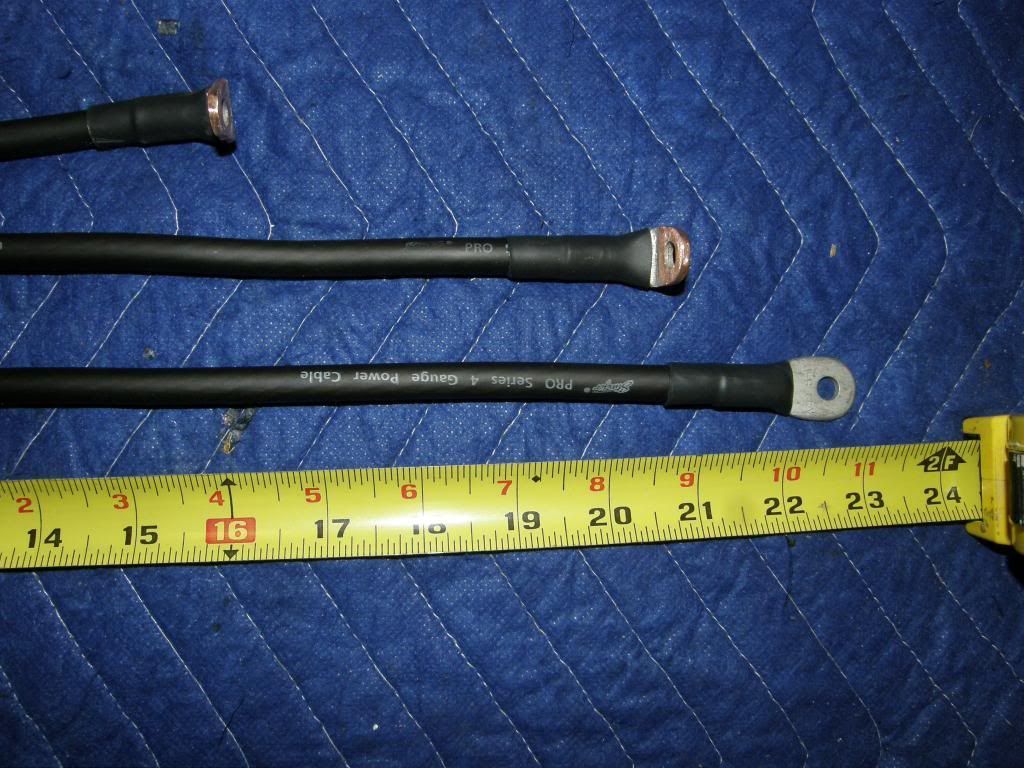
The completed cables looked as follows:
![Image]()
![Image]()
Note that these cable lengths ^^^ were for 02-04 S3 configuration!!!
(the Solenoid/Starter cable could have perhaps been 1-2" shorter as it turned out)
The lugs for the solenoid were modified by bending at 90 deg and also filing them smaller to properly fit the solenoid terminals. That detail should be apparent in the cable pics and final assembly pics.
These following measurements supplied by dkyamada from post #29
Starter Motor to Solenoid - 16"
Solenoid to V+ Battery - 24"
Battery V- to ground - 27"
Use any measurements shown on your own cognizance - measure for yourself ideally.
Installation is pretty straight forward.
The Solenoid is located under the Frame Rear Cross-Member. I chose to replace the Solenoid to Starter Cable entirely, while adding additional parallel 4 GA cables for the battery positive (to Solenoid) and Battery Negative (to Engine Ground)
I elected to have both battery cables run under left side of sub-frame - the right side is already 'busy' with the main harness and the already tight interference of the Fuel Pump Power & Fuel Disconnects. It may have added a couple of inches to the Positive Cable to Solenoid length, but was the best routing in the circumstances.
You can see the difference is Wire Gauge in the following install Pics.
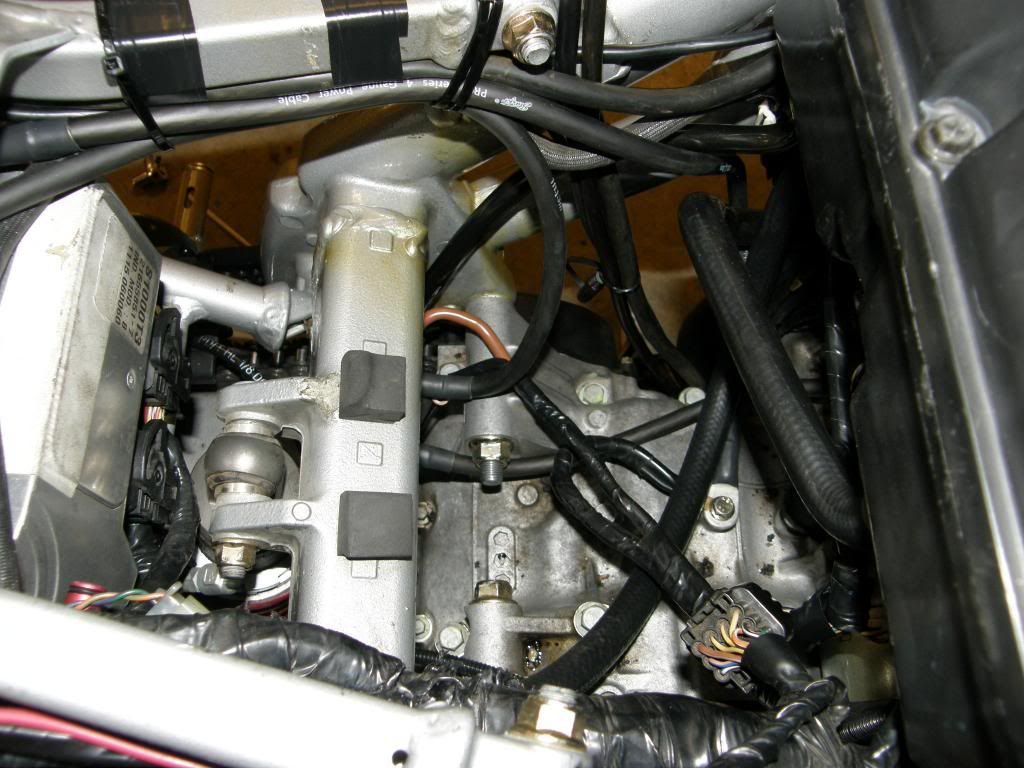
This is the Solenoid pulled out of its Rubber Shroud for access to execute the mod:
![Image]()
And after the new cables are fitted, prior to the Solenoid being re-installed in the Rubber Shroud/Mount:
![Image]()
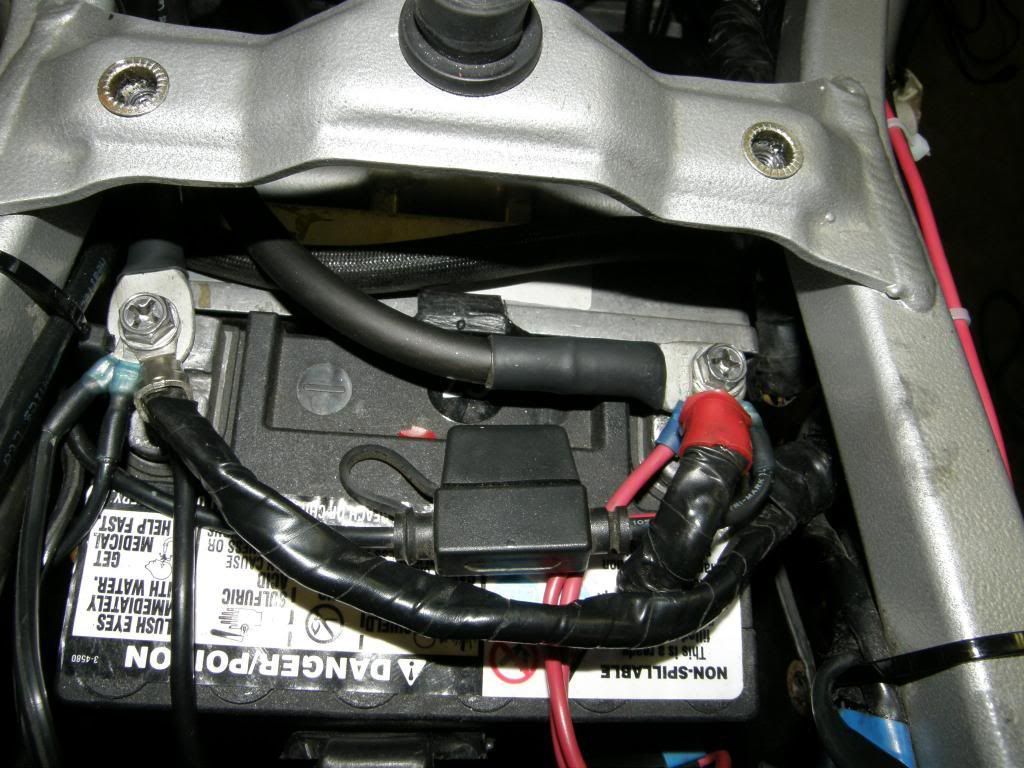
These are final install pics:
![Image]()
![Image]()
The Results:
In order to check the voltage while cranking, I had the bike on side-stand, in gear and with clutch lever tied to bar with TieWrap.
This will allow the bike to crank, but not start - which was desired condition for test.
Also note that Engine had not been started in 24 hrs and was 'cold' (sic - temp in garage was about 90F).
Also during testing, the lights were disabled. (note that this is normal starting condition anyway - just wanted to avoid any unnecessary battery drain so the charge would be similar for both tests)
OEM Condition:
Per above set-up, with Igntion on (no lights) - 12.3V
Cranking Voltage:
11.05V at battery;
9.6V* between starter terminal and starter body.
* it was even lower initially - ~ 9.05 - when re-tested after about 20 secs of cranking, it came up to the 9.6V level.
4 GA Upgrade:
Ignition On - 12.3V (same)
Battery Volts while Cranking - 11.05V (same)
Starter Volts - 10.9V
So picked up 1.3V with the new cables (~14% increase).
And most notably the total loss in the new cables amounts to only 150mV!
Note that there was no charging of the battery from the 'before' to the 'after'.
The result is probably best illustrated by the speed at which the engine turns over as a result:
See/hear the difference in this before/after Video
Conclusion - For about $25 and 3 hrs of leisurely paced labour, very much a worth-while mod.
Should be a lot kinder on the Sprag with greater torque from the starter motor!
Note that the total 'sag' at the battery should be less with the engine fully warmed up, with less viscous oil. And conversely of course in the Frozen Tundra, you could expect greater sag.
Regardless of starting temp however, the loss to the starter should be much improved over the standard cables.
CAUTION: If you plan to terminate the cables yourself, it is CRITICAL that a flawless connection is made - that means the crimp or solder joint needs to be perfect.
This is a HIGH CURRENT circuit and potentially disastrous if executed poorly.
If you do not possess the equipment or capability to execute this, then leave that part to someone else - visit a car-stereo store or similar to have them crimp the lugs for you.
Makes it really simple to get them pre-made to your specs!
This came about as result of discussion with OldnDumb, when I came across an E-Bay vendor selling Starter Cable kits for various bikes, Triumphs included.
The premise actually seemed sound - the price a bit steep for what it is - $75.
So OnD & I both elected to undertake this, he on the 1050 Sprint; mine on the 955i Daytona.
OnD actually was a little less tardy than me in ordering materials & actually completed his a couple of days ago.
The mod involves upgrading the cables for:
Battery Positive - Starter Solenoid;
Solenoid to Starter;
Battery Negative to Engine Ground.
The whole purpose is to reduce voltage drop to the starter, providing maximum energy from battery to starter motor.
I failed to take a comparative pic for my own cable set, but is essentially the same size-wise - 4 GA is 4 GA!
The project materials are 4 GA UltraPure Copper Wire and Tin-Plated Copper Lugs.
I bought some Cable sold by foot from an Auto Audio supplier on EBay (there are quite a few - shop around) - bought 8' and had a couple left over
If you were frugal, you can see 6 would be plenty.
The Lugs and Pellets I got from GenuineDealZ - with name like that, has to be good right?
Note that they also have an assembly service so if you buy the cable, lugs and heat-shrink from them, it will cost you additional $6 to have them pre-assembled.
I probably overdid it on the lugs - got the heavy wall items when in retrospect the std would have probably been plenty adequate.
Size of course is 4 ga 1/4".
We used different techniques for the cable assembly, more driven by what was at our respective disposal, as opposed to a technical preference.
OnD used a creative self-fabricated crimp tool (hopefully he will follow with pics as an addendum); I wanted to try another inexpensive method.
My lugs were soldered onto the terminals by use of Solder Pellets.
The lugs and wire were lightly coated in flux and then the lug was heated with Propane torch until the solder pellet melted; at this point the stripped cable end is inserted into the lug and when source heat is removed, it cools rapidly and the cable is securely fastened to the terminal.
This is the type of system I used (not same brand, but similar principle):
Alternatively, the lugs may be crimped onto the cable.
There are inexpensive 'hammer' (or vice) type crimpers available for ~ $20.
Or try your local Auto-Stereo Install Shop - you may be able to source some inexpensive off-cuts of 4 GA wire, as well as having them crimp the lugs for you.
The completed cables looked as follows:
Note that these cable lengths ^^^ were for 02-04 S3 configuration!!!
(the Solenoid/Starter cable could have perhaps been 1-2" shorter as it turned out)
The lugs for the solenoid were modified by bending at 90 deg and also filing them smaller to properly fit the solenoid terminals. That detail should be apparent in the cable pics and final assembly pics.
These following measurements supplied by dkyamada from post #29
Starter Motor to Solenoid - 16"
Solenoid to V+ Battery - 24"
Battery V- to ground - 27"
Use any measurements shown on your own cognizance - measure for yourself ideally.
Installation is pretty straight forward.
The Solenoid is located under the Frame Rear Cross-Member. I chose to replace the Solenoid to Starter Cable entirely, while adding additional parallel 4 GA cables for the battery positive (to Solenoid) and Battery Negative (to Engine Ground)
I elected to have both battery cables run under left side of sub-frame - the right side is already 'busy' with the main harness and the already tight interference of the Fuel Pump Power & Fuel Disconnects. It may have added a couple of inches to the Positive Cable to Solenoid length, but was the best routing in the circumstances.
You can see the difference is Wire Gauge in the following install Pics.
This is the Solenoid pulled out of its Rubber Shroud for access to execute the mod:

And after the new cables are fitted, prior to the Solenoid being re-installed in the Rubber Shroud/Mount:

These are final install pics:
The Results:
In order to check the voltage while cranking, I had the bike on side-stand, in gear and with clutch lever tied to bar with TieWrap.
This will allow the bike to crank, but not start - which was desired condition for test.
Also note that Engine had not been started in 24 hrs and was 'cold' (sic - temp in garage was about 90F).
Also during testing, the lights were disabled. (note that this is normal starting condition anyway - just wanted to avoid any unnecessary battery drain so the charge would be similar for both tests)
OEM Condition:
Per above set-up, with Igntion on (no lights) - 12.3V
Cranking Voltage:
11.05V at battery;
9.6V* between starter terminal and starter body.
* it was even lower initially - ~ 9.05 - when re-tested after about 20 secs of cranking, it came up to the 9.6V level.
4 GA Upgrade:
Ignition On - 12.3V (same)
Battery Volts while Cranking - 11.05V (same)
Starter Volts - 10.9V
So picked up 1.3V with the new cables (~14% increase).
And most notably the total loss in the new cables amounts to only 150mV!
Note that there was no charging of the battery from the 'before' to the 'after'.
The result is probably best illustrated by the speed at which the engine turns over as a result:
See/hear the difference in this before/after Video
Conclusion - For about $25 and 3 hrs of leisurely paced labour, very much a worth-while mod.
Should be a lot kinder on the Sprag with greater torque from the starter motor!
Note that the total 'sag' at the battery should be less with the engine fully warmed up, with less viscous oil. And conversely of course in the Frozen Tundra, you could expect greater sag.
Regardless of starting temp however, the loss to the starter should be much improved over the standard cables.
CAUTION: If you plan to terminate the cables yourself, it is CRITICAL that a flawless connection is made - that means the crimp or solder joint needs to be perfect.
This is a HIGH CURRENT circuit and potentially disastrous if executed poorly.
If you do not possess the equipment or capability to execute this, then leave that part to someone else - visit a car-stereo store or similar to have them crimp the lugs for you.


